Kofta’s are one of the most mouth water inducing recipes from Indian kitchen’s. Loved by all, and cooked to celebrate special occasions, or a sometime treat or just celebrating the onset of a weekend, which is why I had cooked it. It’s rich, it’s spicy and unbelievably flavourful. The process though elaborate is hardly difficult. If I can make it anyone in this galaxy can..
It’s got a couple of steps, since it involves two stages-1) curry & 2) Kofta’s (spicy fried vegetable balls)
So we start with step 2. i.e. the making of the kofta’s.
Assemble your ingredients- for the kofta making you will need.
-1. Oil for deep frying
-2. Boiled potatoes mashed 1/2 cup
-3. Steam and water drained bottle gourd1/4 cup
-4. Paneer 2 tbsp
Before proceeding, lets figure out how we can completely drain the gourd of it’s water.
 take the gourd and grate it well. If you’re like me- keep a band aid handy.
 this is what the green mass of the gourd will look like.
 throw it in a deep pan- mine looks like a well, but yours doesn’t need to. Throw it in without adding any water- keeping the heat on very low cover and cook for not more then 10 minutes.
 After 10 minutes you’ll see all this water accumulated in your pan or well in my case. We need to separate that- take a cheesecloth or any fine cloth and drain, squeeze it using your hands, but please let this stuff cool down first or wear gloves. squeeze out all the water- any moisture ad it will refuse to bind completely, and we don’t want to fry a mess of green mass.
 This is what it will look like after draining out the water. You will realize the mass has reduced. fret not.. it’s A-OK..
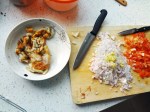
 This is our line up of ingredients for the Kofta’s. Boiled & mashed potatoes. I used some leftovers from the Aloo Parantha but you can always just use your boiled potato mashing it well, and the white wodge of beauty is Paneer of course. (you can refer to my Paneer making 101 post).. well that’s it, mash them all together, using 1tsp salt, 1 tsp ground coriander, 1/2 tsp red chilli powder.
 This is what it’s all going to look like once we have mixed it well.
 Scoop out small bits of this mixture and using your hands roll them into balls or these cylindrical little babies. I always make them this way cuz my mom always made them so, and they taste amazing and I miss my mom now…
That’s it, heat your oil, and deep fry these little green monsters until they’re golden and crispy.
 Drain them on a paper towel resist the urge to eat them. they’re perfectly edible this way with some ketchup. great snack or beer companions.. I had 4 .. No I didn’t eat any.. yes I did.
This is it.. the Kofta part is done. Going to the curry. easy as a breeze. get your blender ready.
 This is the line up of the curry ingredients. 1 big fat onion, 1 not so fat tomato red as blood, 2 green chillies the spicier the better, 3-4 garlic cloves, 1 inch ginger.. Blend it all together.
 fresh out of the blender and a mess on my kitchen counter. this is what it will look like.
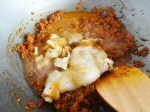
There isn’t more to it now. take 2 tbsp oil from the leftover oil used for frying. take a pan/wok heat the oil and add in 1/4 tsp of cumin seeds, 1/2 tsp of freshly ground black pepper & the paste .
 This is what it’ll look like while it’s cooking. Give it around 10 minutes to completely cook. You’ll know it’s cooked when you feel like dipping your face into the curry. resist the urge- no good outcomes.. trust me.
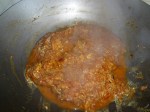
 Here it is, now completely cooked. Blistering red and flavorful. Add in 1/2 tsp turmeric, 2 tsp ground coriander, 2-3 tsp salt (depending on your love for salt), 1/2 tsp cinnamon, stir and let cook for another few minutes.
 Finally add in water arund 250 mls, give it a good stir to combine with all the paste, check to taste, and add in salt according to your taste. add in 1/4 tsp of sugar to balance out the salt and spices and when almost done, add in the kofta’s and cover for a few minutes before serving.
Serve with rice or bread and dive in.. It’s so pretty and sooo tasty.
Ingredients
For the Kofta’s
1/2 cup boiled mashed potatoes
1/4 cup bottle gourd grated and well squeezed
t tbsp paneer
1 tsp salt
1 tsp ground coriander
1/2 tsp red chilli powder
Oil for deep frying
mash together all these ingredients. Using your hands scoop them and make into small balls. Fry them till deep golden and drain on a paper towel.
Curry:-
1 large onion
1 ripe red tomamto
1 green chillies
3-4 cloves of garlic
1 inch ginger.
2-3 tsp salt
2 tsp ground coriander
1/2 tsp cinnamon
1/4 tsp sugar
1/4 tsp cumin seeds
1/2 tsp fresh ground black pepper.
1/2 tsp turmeric
200 mls water
2 tbsp oil for cooking.
Blend together the onion, tomato, garlic, ginger and chillies to a smooth paste. Heat oil in a pan, once hot add in the cumin seeds and the pepper. Once they start sputtering tip in the blended paste and let cook till the oil starts separating or the mixture turns deep red and brown. Add in the turmeric, coriander powder, cinnamon powder, salt and stir to combine and let it cook for another few minutes. add in the water and mix well into the paste. let it bubble a bit and add in the sugar. Cover and cook for a few minutes and finally add in the Kofta’s draining on the paper towel. Cover for some time before serving with rice or breads..
Enjoy !!!

 This Technicolour green, diabolically spicy chutney is one of my mom’s recipe’s, and I have adopted this with absolutely no changes. If it ain’t broke, don’t fix it, and if it’s magnificent then just blindly follow it.

 The traditional Indian Aloo Parantha or potato stuffed bread if you please..it makes up for the most popular and loved breakfast in India. It’s hearty, tasty and a complete meal in itself without the addition of a lot many things. Easy to make, and honestly- extremely tasty !! The only catch is to make it right and evenly so that there are no thick chunks of flour in between while you eat. The potato stuffing needs to be even and spread well out between the soft flour folds.
 Now we are going to doll it up..
 here I have 1 green chilly (not red) chopped- I used scissors remembering the burns I got while channeling my inner Joan of Arc and dismembering crazy jalapenos last time. My fingers burnt for almost 2 days. 1/4 tsp red chilli powder, 1 tsp ground coriander and 1 1/2 tsp salt.. the worst thing on this earth is to have bland aloo parantha.
 This right here can be eaten as it is..It’s tasty I tell you.. it is..well this is the stuffing made.. now for the stuffing to be stuffed
 Here is the elusive dough.. nice & soft. Scoop out and roll into a thickish ball.. we have to stuff it remember.. so roll it well.. admire it’s roundness and pray it ends up pretty..
 I don’t know how to explain it all in writing.. but here it is. This is how we do it. Flattening the round ball (sigh…) putting a scoop of potato stuffing between it (please make it a lot smaller than the dough ball)
 Envelope the dough around the potato mixture.. voila !! it’s disappeared make it like a pouch around it and flatten the tepee like top.
 using extra wheat dough and dabbing it all too generously, flatten it gently, making sure the stuffing stays inside.. Now whip out your rolling pin and gently roll it out.
 Rolling out the disc and ensuring tings don’t start peeking out from everywhere.. This ain’t a perfect round, in my defense my rolling pin is all wrong..
 Paneer: the immaculate white cubes of milk, while largely known as Indian cheese is in fact not much like cheese at all.. It’s milk that has been curdled, separated from the whey and compacted. The whole process doesn’t last anything more than 15 minutes. Beautifully adapted into any dish of choice and eaten just as it is with salad- Paneer is unanimously loved by each and every Indian in every form, shape and dish. vegetarians thrive on it because it can be prettied up and made into the richest of dishes, and in fact be made into a bajillion dishes if you ever were to count.
 Pour milk into a saucepan (try and use full fat milk) and let it come to a boil.. don’t grow impatient and dont keep playing with the gas knobs like me.
 Once it’s come to a boil and make sure it has, add in the white vinegar 1 tsp.. increase the amounts only slightly whence you increase the milk.. we don’t want out paneer vinegary.
 Please don’t stare at my kitchen walls.. take a moment and watch paneer making in process. This is the curd separating from the whey which btw is extremely rich in proteins.
 Well, this is what it should all look like.. we have yet to separate the whey.
 take a really fine cloth, cheesecloth or in my case a stolen kerchief from a stack of my husband’s white and soft kerchief piles.
 You can see the whey is separated. Discard it and put the cloth back in try squeezing it out once it has cooled down a bit, this is very very hot right now. You can even hang it and let all the whey slowly drip out, if you have the time. I’m impatient and I always burn my palms.. but such is life.
 This is after burning my palms and squeezing out all the whey.. let it rest awhile.. if you want: put something heavy on top of it and let it be for some time, until it has finally cooled down and is ready for the unraveling..
 Behold !!! the conversion of milk into this beautiful, springy, soft and almost crumbly paneer. You can cut it into cubes or mash it or just eat it with a salad, or sprinkle some salt n pepper or your favourite dressing and have it with your drinks..

 Into a blender put in 1 onion, 2-3 cloves of garlic, 1 green chilly, 1/2 inch of ginger and blend into a frenzy.
 this is what you’ll get after blitzing it all together. A very nice and grainy paste.
 heat 1 tbsp oil in a wok and pour the puree into it and let it cook. In the meantime lets get on with the rest of the ingredients
 Here it is, the glorious, red tomato pulp.
 In the meanwhile, we have the onion, garlic and ginger puree now cooked and ready for the grated tomato pulp to be added in.
 The gravy is turning a brilliant red after adding in the tomato. I have let it all cook for 5 minutes and added in the salt and given it a good stir. Make sure that you have cooked it all through before you add in the spices.
 1 tsp of dried coriander into the cooked tomato onion gravy..
 1/4 tsp cinnamon for the brilliant aftertaste.. cinnamon has to be my favourite spice hands down!!!
 Finally, 200 mls water to the whole paste.. this is what turns it all into a wonderful curry..
 The last & final addition of eggs into the curry, after which just cover and simmer for another 5 minutes..Do keep checking it by tasting it for salt.. we all have different love for salt