Tofu seafood kimchi stew ๐ŸŒถ๐ŸŒถ๐ŸŒถ


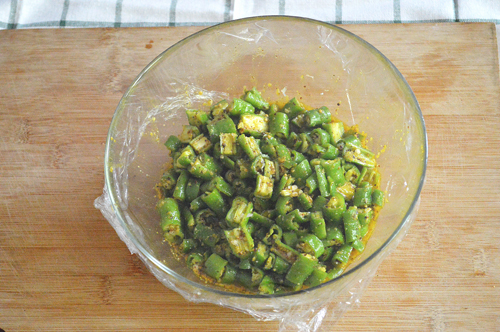
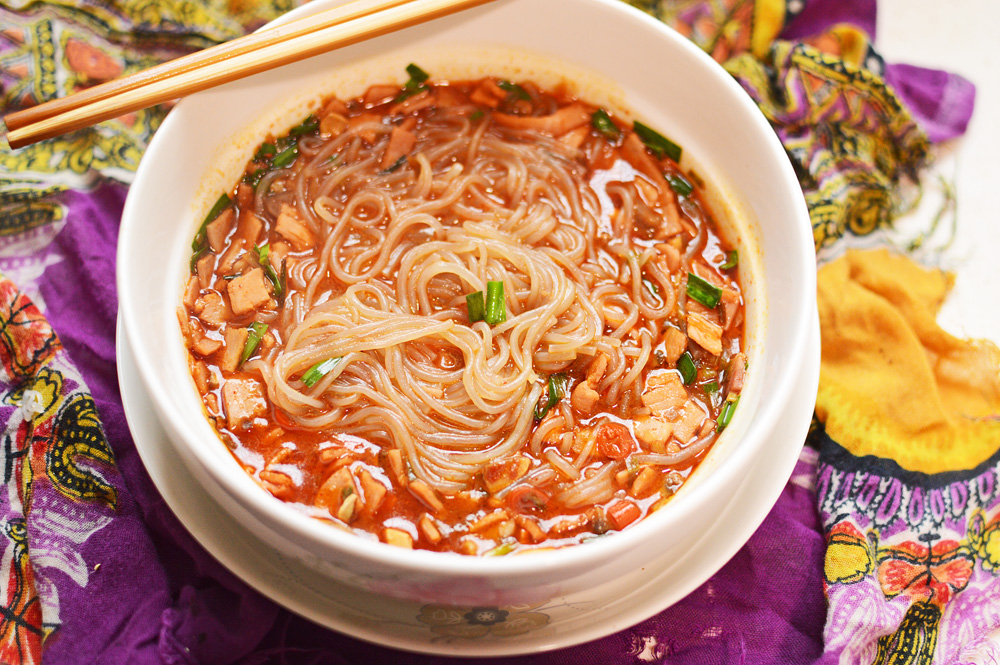
To stave off burgeoning winters and bring the cozy back, this kimchi stew with the airs of a soup isn’t just for bringing forth the warmth but for setting your soul on fire. It is spicy hot and deliciously addictive in its sweat inducing mouthfuls of tofu, seafood and noodles cooked in a luridly red broth of Korean inspired fiery flavours.

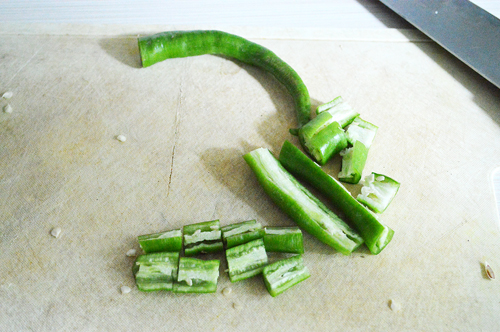
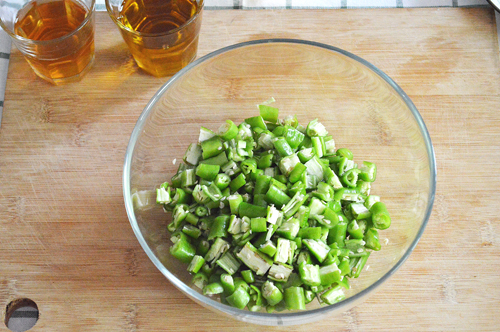
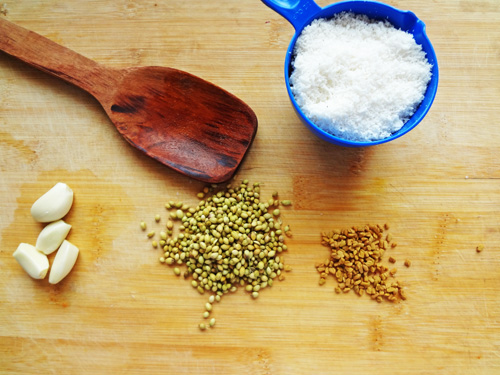
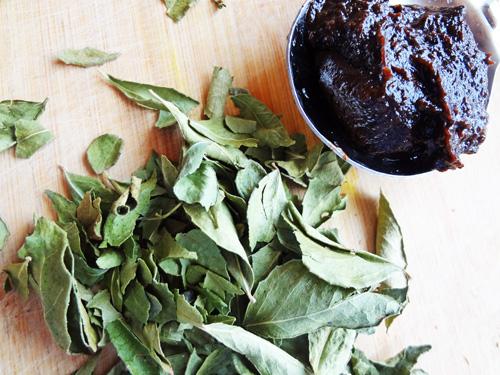
Being a Korean inspired stew with the very essence of Korean cuisine that is Kimchi, this stew also needs a few Korean pantry essentials that is ‘Gochujang’ which is a thick spicy sweet Korean paste and Korean peppers called ‘Gochugaru’ which I think you can substitute with some paprika in this recipe or even chili powder from the Indian grocery. Apart from that the ingredients are straightforward. There’s garlic, fish, shrimp, kimchi, tofu (soft or hard are both alright as long as it’s not smoked), sliced green chillies and onions, chicken base, fish sauce, soya sauce and noodles of your choice.

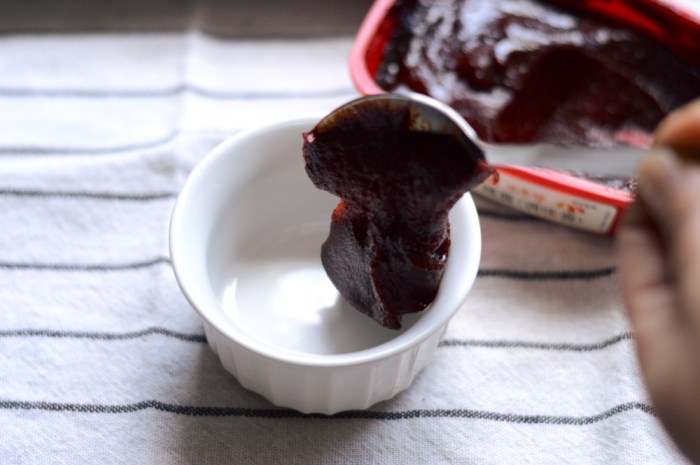
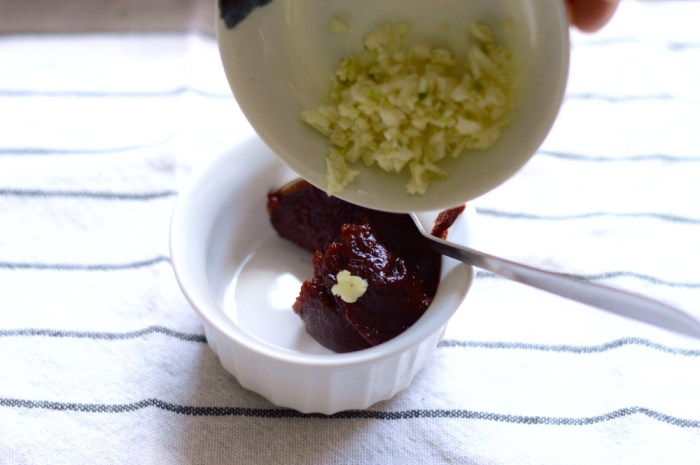
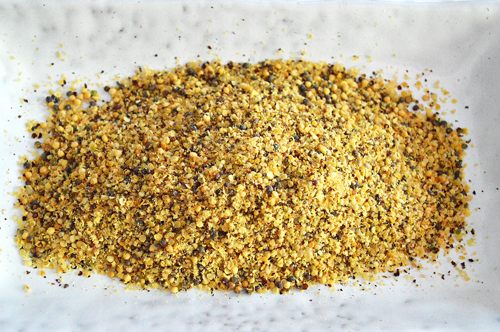
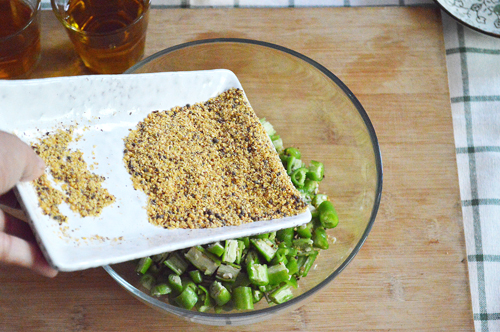
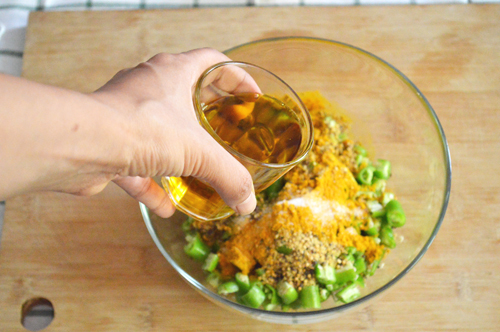
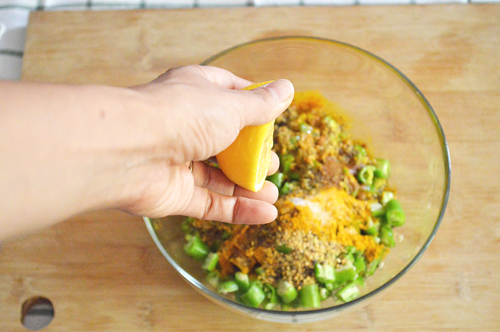
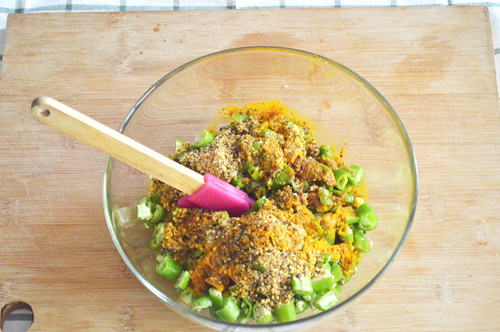
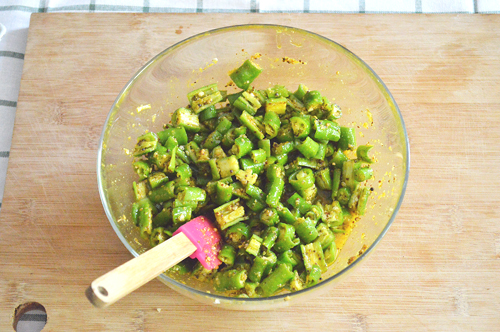
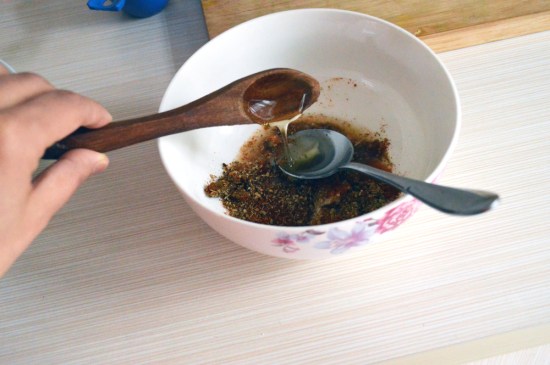
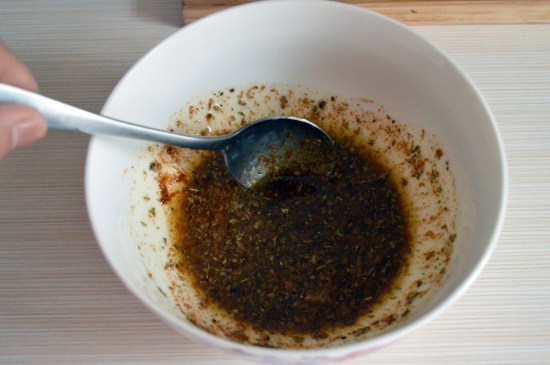
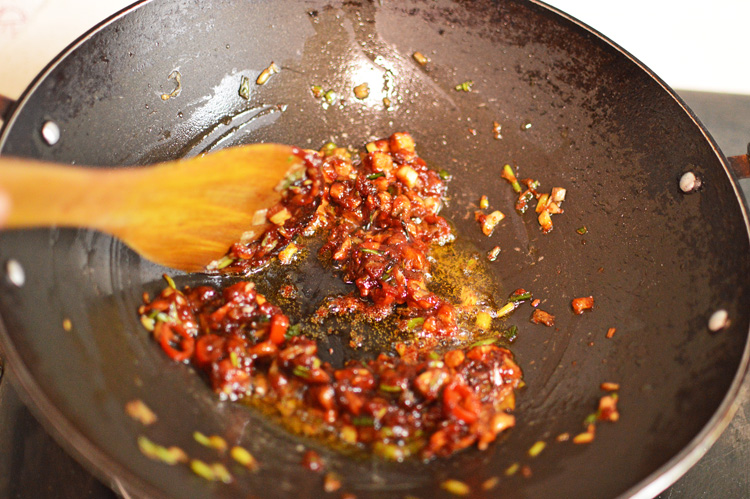
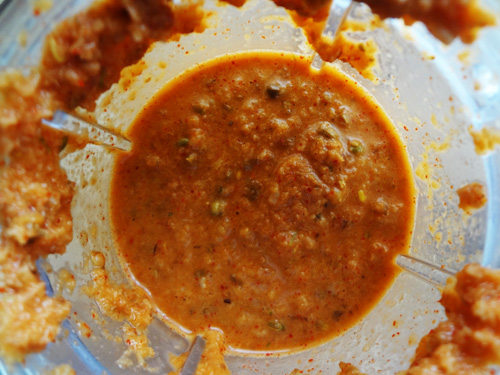
In a clean bowl mix together the crushed garlic with the gochujang and red pepper flakes

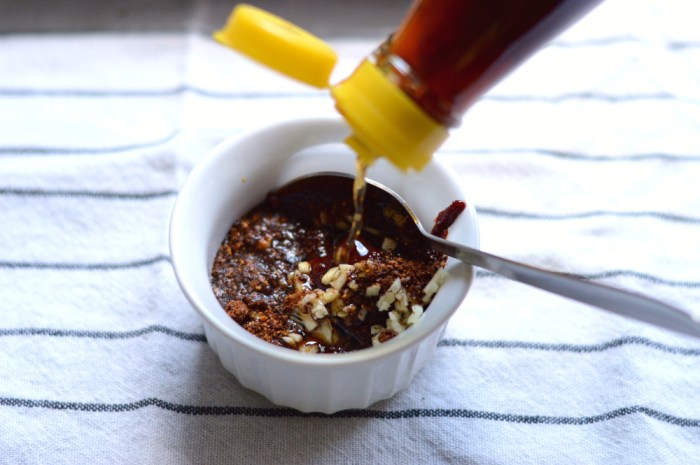
And the soy sauce and fish sauce. Mix well to form a flavour base.

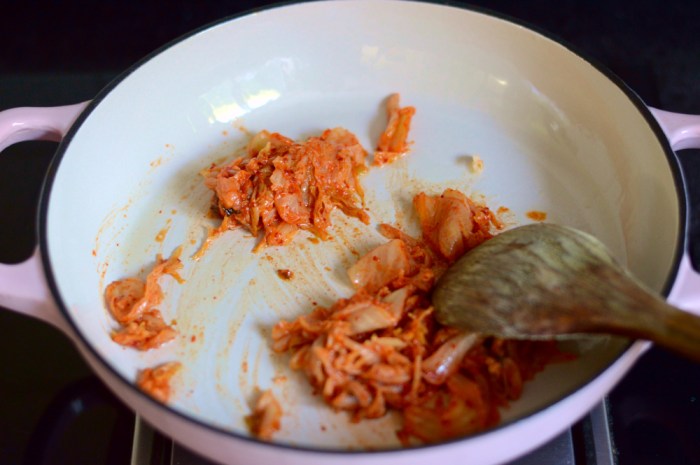
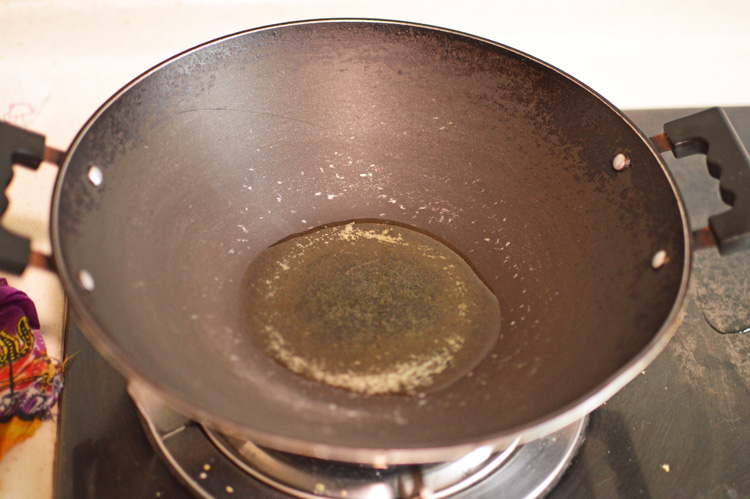
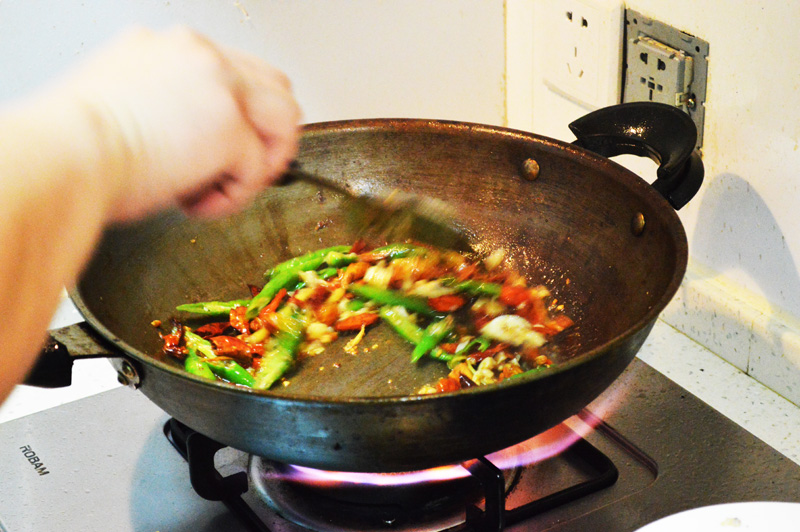
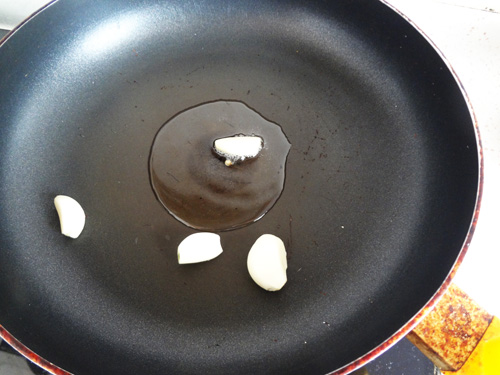
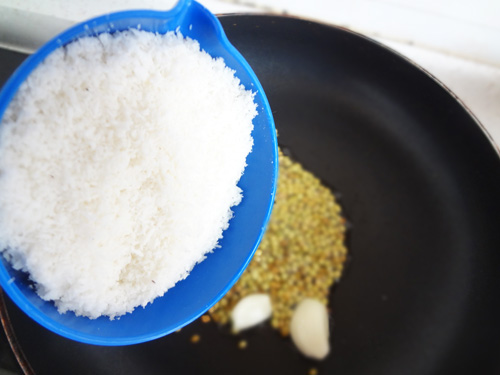
Heat a large pan and add in the kimchi. Stir it about lightly, making sure the pan isn’t very hot.

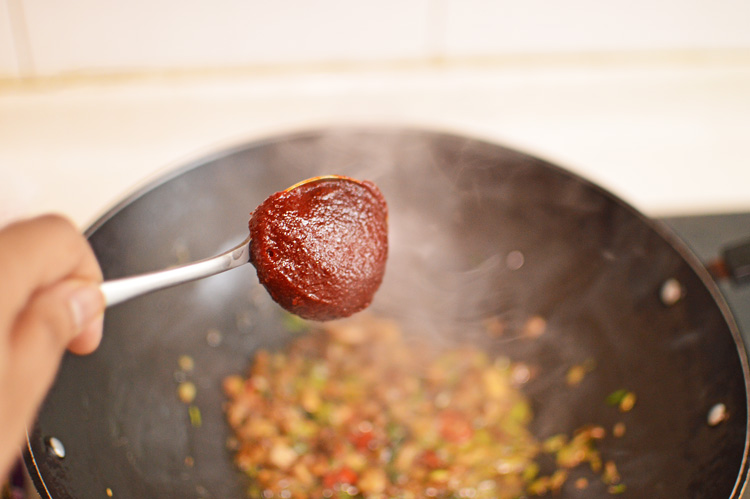
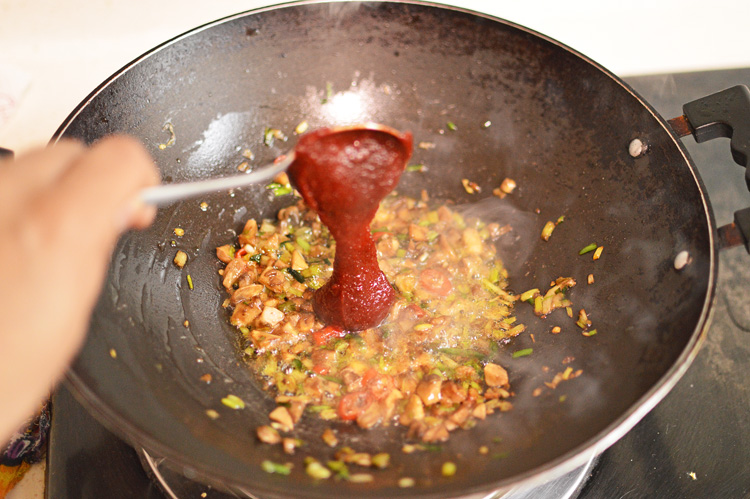
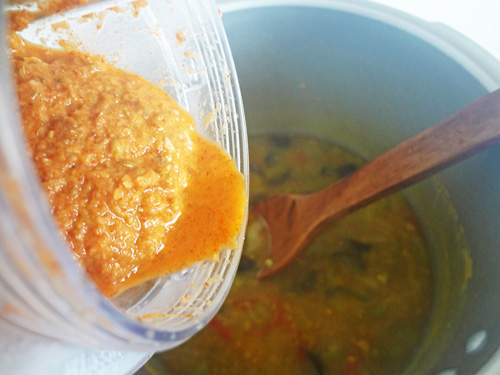
Add the flavour base to the pan and stir

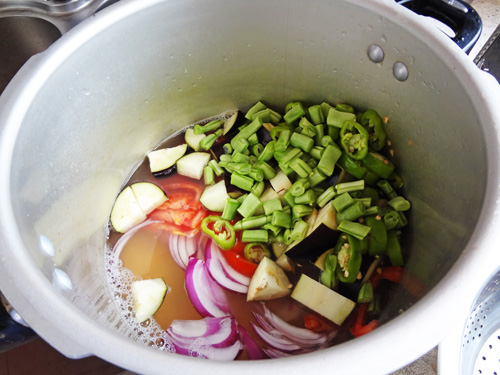
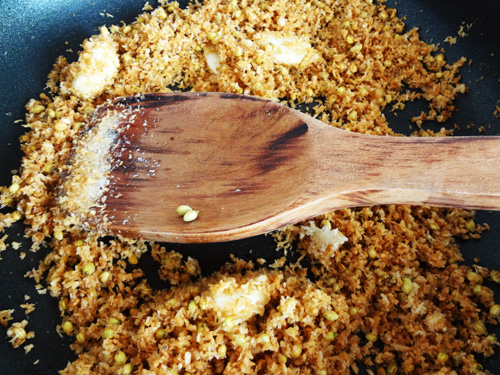
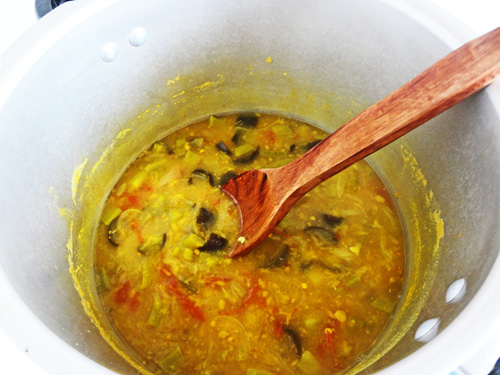
Keep stirring until it begins thickening for about a minute. Then add enough water for the broth

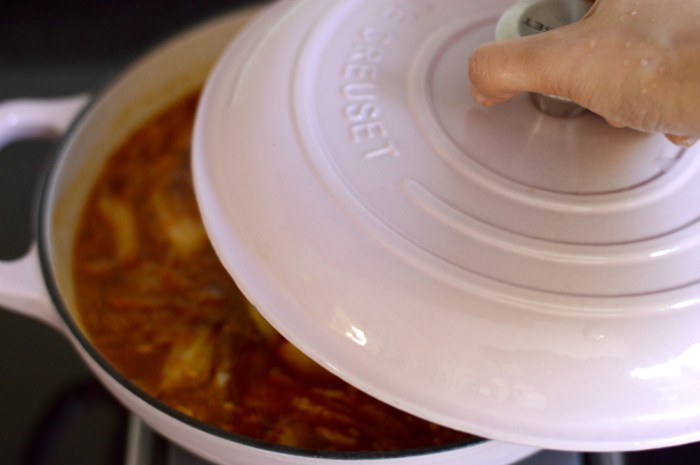
Cover the pot and let it cook for at least ten minutes. Add more water if it gets too thick

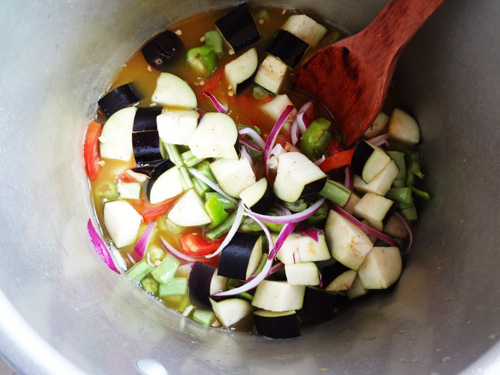
After ten minutes add the seafood and the chicken base.

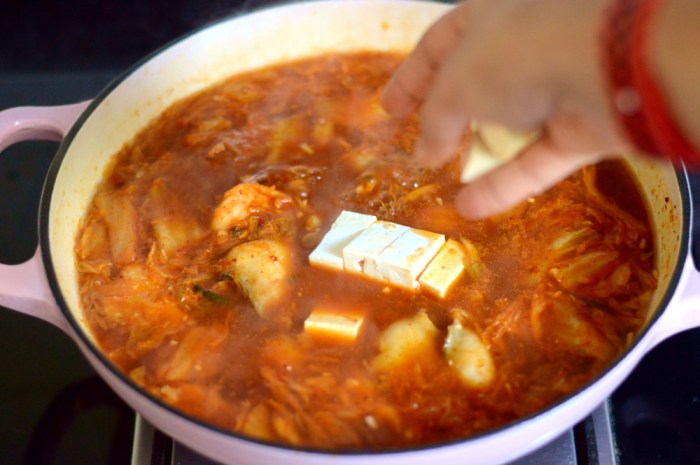
And just as it starts to come up to a bubble add the tofu.

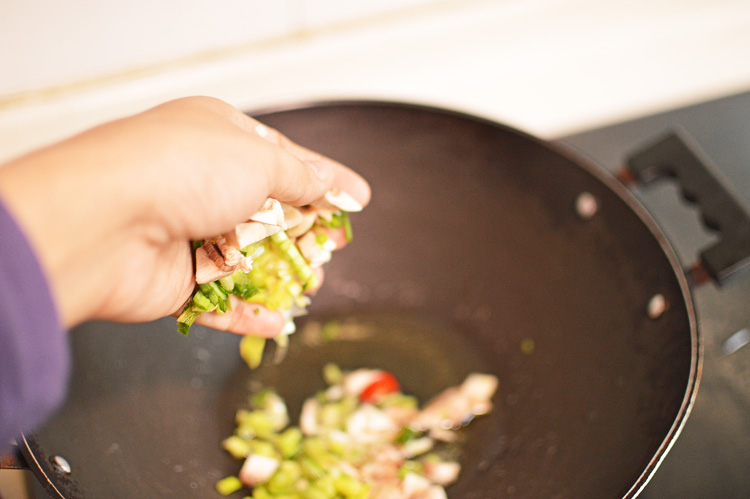
Followed by thinly slices onions, reserving a few for final garnish. Bring it to a boil and let it bubble a few minutes before adding in the noodles.

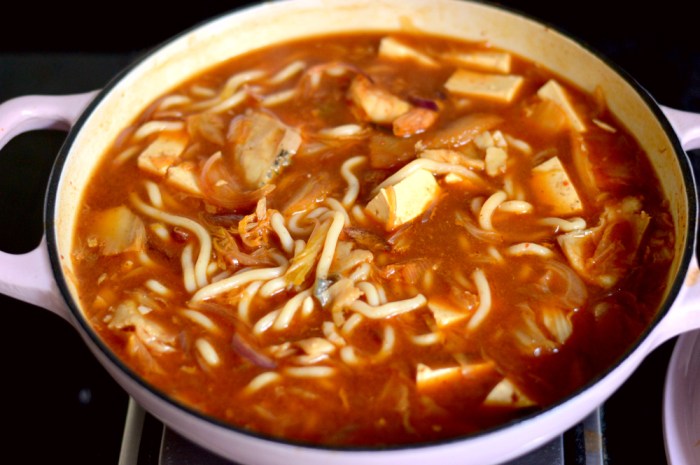
After a few minutes of boiling add in the noodles (preferably cooked noodles). Let it come to a simmer before serving.

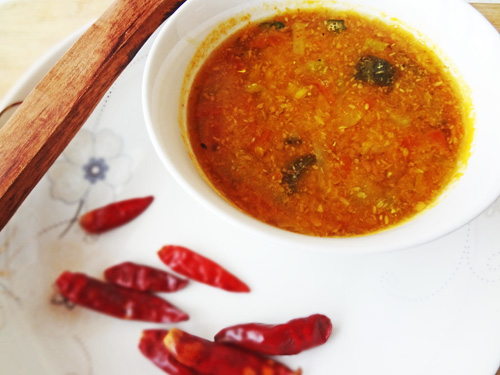
Garnish with sliced green chillies and thinly slices onions.


Recipe ingredients

Kimchi: 150g
Gochujang: 50g
Fish sauce: 2 tbsp
Soy sauce: 2 tbsp
Chicken base (optional):1 tsp
Crushed garlic: 1 tbsp
Korean chilli peppers (gochugaru): 1 tbsp
Fish/shrimp/seafood of choice: 100-200g
Tofu: 150-200g
Noodles (cooked): 200g
Onion: 1 small thinly sliced
Green chillies (optional): chopped
Water: 700mls

Recipe instructions

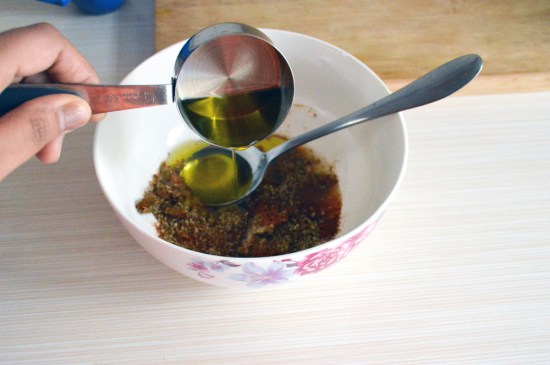
In a clean bowl mix together the gochujang paste with crushed garlic, soy sauce, fish sauce and red peppers to make the flavour base for the stew.

In a large pan on medium heat cook the kimchi lightly for a few seconds until just warmed through. Add the flavour base for the stew and stir it with the kimchi until it begins to thicken. Add water and let it come to a boil. Reduce the heat to low and cover and cook for about ten minutes to let all the flavours mix well.

After ten minutes add the seafood to the broth, followed by the chicken base if using and let it come to a quick bubble before adding in the tofu and finely sliced onions. Reserve a few slivers for garnishing later.

Cover the pot and let it cook for another five minutes after finally adding in the cooked noodles.

Let everything come to a gentle simmer before finally dishing spicy ladlefuls into bowls and garnishing with green chillies if using and reserved slices of onions.

Serve hot!


Instant chilli pickle


DSC_1182

For when you want to add a little something-something to a dish that doesn’t taste just there yet or feels flat or maybe you just want a tiny spice kick and spicy texture to enhance and complement the food then this is the pickle of instant dreams because it adds that fresh zing and unique flavour that you could have been looking for but didn’t know where to find.

It’s quick in that it’s instant and depending on the chillies you put it can vary from anything naughtily mild to demonic hot.

DSC_1154 copy

Doesn’t hurt that it’s full of ingredients really good for you and how they come to marry in perfect harmony to form this delicious pickle.

DSC_1160

Chop and dice the green chillies into smaller than bite-sized pieces and remove any seeds if you want. These chillies though large in size are rather tame in taste, in fact, they’re almost sweet and so I didn’t much bother with deseeding them.

DSC_1158

Crush the yellow and black mustard seeds till some are fine dust and some still intact.

DSC_1164

Find a suitable bowl for mixing the pickle.

DSC_1168

Add crushed mustard seeds to the chopped chillies

DSC_1170

followed by salt and turmeric

DSC_1173

In with apple cider vinegar

DSC_1175

mustard oil

DSC_1176

and lemon

DSC_1177

give everything a thorough mix

DSC_1178

until spicily combined

DSC_1180

This is ready to be eaten immediately. Alternatively, you can cover and keep for a day for the flavours to mingle and mellow before transferring to a clean jar. This will keep well for several weeks or you can transfer to a fridge after a few days.

(Note: the flavours will intensify with each day and the mustard seeds lend a pungent spiciness of its own which is most desirable in such pickles.)

DSC_1185

You can add this to rice, slices of bread and anything you feel could do with a boost. I have tried mixing it with boiled pasta during days of lazy inactivity and loved every morsel of it.


Ingredients

Chillies: 250g

Lemon: 1

salt: 2tsp

Turmeric powder: 1tsp

Mustard seeds (crushed): 30g (you can use either all black or all yellow or a mixture of both)

Mustard oil: 70mls (or use olive oil if mustard oil is unavailable)

Apple cider vinegar: 60mls


Recipe instructions

Crush the mustard seeds until some are pulverized and some whole. Chop chillies into small pieces and add to a bowl.

Mix in the mustard seeds, turmeric, salt, oil, vinegar and lemon juice.

Cover and keep for a day or decant into a clean jar to be eaten immediately.

Note: The addition of vinegar increases its shelf life and this pickle can be stored for several weeks, however, you can store this in the refrigerator after a week as well.


Spicy baked chicken and potatoes


DSC_0275
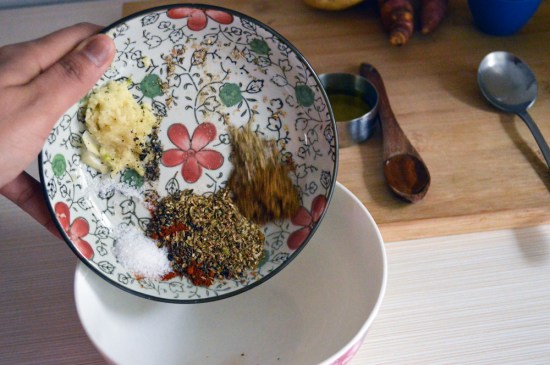
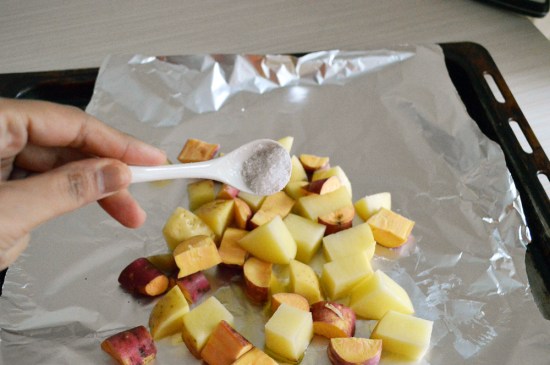
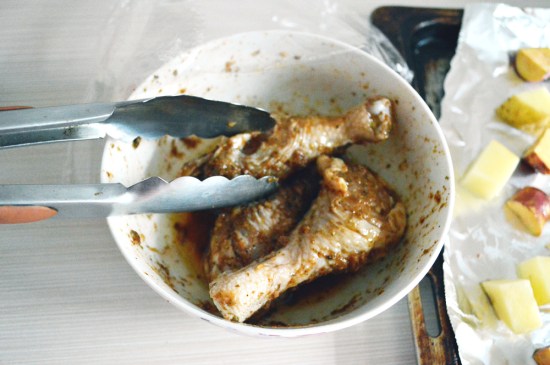
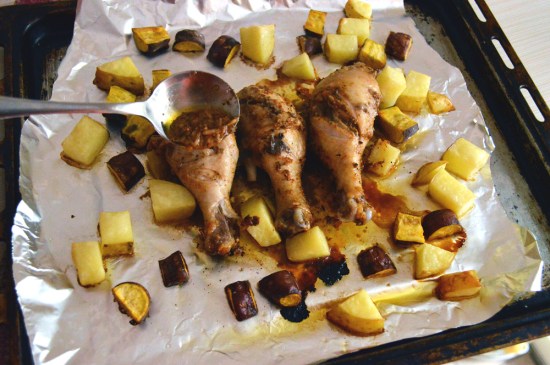
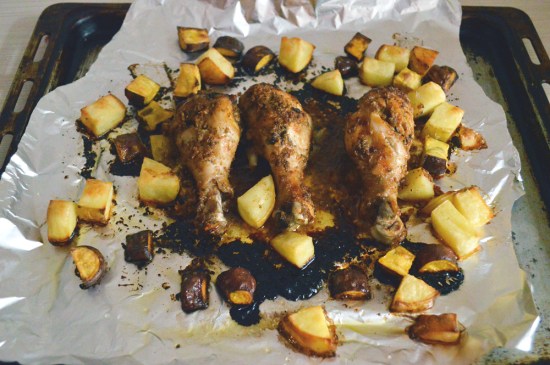
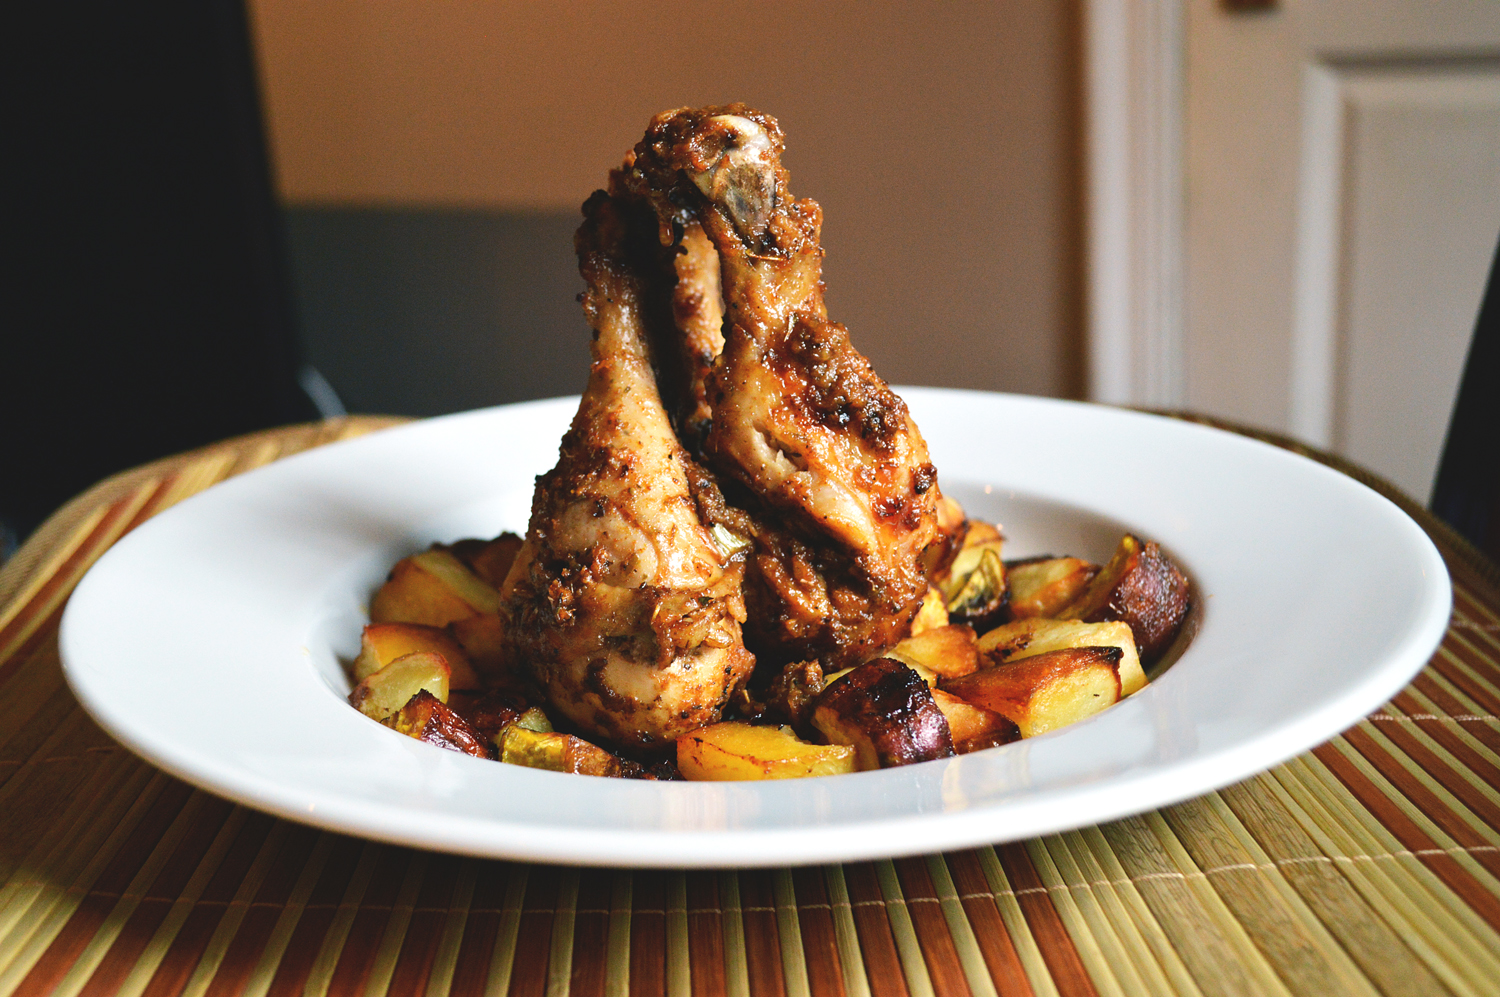
When you can feel the carnivore inside of you bubbling with primal instincts to tear into something meaty, something delicious and spicy, this chicken recipe with potatoes is just the thing. Savagely inoculated with flavours on a loudspeaker, there is nothing remotely subtle about this dish. It’sย deliciously loud with mouthwatering piquancy, tender, juicy of flesh and drool inducing. The balanceย of tastes rendered stupefyingly lush with succulent aromas is so heady that it’ll send your entire house warming with tempting incense of tantalizing proportions.

Cooking it with potatoes just makes it a more complete meal, and there’s nothing more you’d wish for a better lunch.


DSC_0213 copy

It doesn’t involve much in the way of fanfare, and most ingredients are easily available. Chicken drumsticks, olive oil, honey, crushed garlic, oregano, cumin powder, paprika, salt, black pepper, lemon juice and potatoes. I’ve used two different kinds of potatoes, but feel free to use whatever potatoes you like or have on hand.


DSC_0215

for tender, juicier results we want to marinade the chicken for which you begin by slashing said chicken down to the bone. This helps with even cooking, and lets the spices penetrate in deep.


DSC_0217

The marination is easy. Mix all the spices in a bowl


DSC_0220

along with lemon juice


DSC_0222

honey


DSC_0224

and olive oil


DSC_0225

mix it all together to form a sort of paste.


DSC_0226

Coat the drumsticks in the the marinade, making sure it’s seriously coated.


DSC_0227

cover with a cling wrap and let it marinade in the fridge for a couple hours. You can do this bit of activity sometime during breakfast if you want to make it for lunch.


DSC_0229

Prep your potatoes by cutting into bite sized cubes


DSC_0230

drizzle a bit of olive oil


DSC_0231

and a bit of salt. Nothing else needs be done to the potatoes.


DSC_0233

Be sure to take the chicken out of the fridge at least 15 minutes before baking, so as to allow them to come to room temperature.


DSC_0234

give it a final quick mix in the marinade before baking


DSC_0235

place drumsticks on a bed of potatoes and bake at 200ยฐ for 30-35ย minutes


DSC_0249

about half way between baking time pull out the chicken and slather all the remaining marinade on top and under using tongs to rotate these pieces to get an even marination.

You won’t believe how good it smells.


DSC_0252

This is it! they’re done. Let them rest for a few minutes before chomping in. Tender, moist, juicy, succulent. They’re so delicious you’d have to find another word for delicious, and don’t even get me started on the potatoes that have soaked in the flavours from the marinade and turned into crispy pieces of delectable spuds. YUM!


DSC_0284


Ingredients

Chicken drumsticks: 3-4 in nos.

Potatoes: 2 in nos (1 sweet and 1 regular baking potato)

olive oil: 1 tsp

salt: 1/4 tsp

For the marinade

Crushed garlic: 1 Tbsp (2-3 garlic cloves)

Dried oregano: 1 Tbsp

Cumin powder: 1 Tbsp

Paprika: 1 Tbsp

Crushed black pepper: 1/2 Tbsp

Salt: 1 tsp

Lemon juice: 2 Tbsps

Honey: 1 tsp

Olive oil: 4 Tbsps (60 mls)


Recipe instructions

Make slashes on the chicken drumsticks to the bone, especially on its thickest parts, and make sure the meat has no water sticking to it or dry it with a paper towel. This helps the marinade cling better.

For the marinade, mix all the spices, salt and crushed garlic in a bowl along with lemon juice, honey and olive oil. (the addition of honey doesn’t sweeten anything except balance the tartness and spiciness of the marinade). Give it a good mix until everything is well incorporated and toss in the chicken. Use tongs for even coverage of the mixture on the meat.

Cover and let rest in the fridge for a few hours before baking.

Pull it out of the refrigerator at least 10-15 minutes before baking time to let it come to room temperature, thus ensuring even baking.

Chop potatoes into bite sized cubes and drizzle with olive oil and sprinkle salt. Cover baking tray with aluminium foil and place the potatoes and chicken drumsticks. Bake in a preheated oven atย 200ยฐ for 30-35ย minutes.

Halfway between baking time pull the chicken out of the oven and drizzle all the remaining marinade to coat or rather smother it, using tongs to flip the chicken on all sides to soak up the marinade.

Bake it for remaining time and let rest for a few minutes before serving.

NOTE: To know whether the chicken is done, insert a knife in the thickest part of the drumstick, and if the juices run clear then it’s cooked. If the juices are still red then you need to put it back into the oven.

Serve on a warm plate.

DSC_0280

Enjoy!!


Korean style noodles


DSC_0746After binge eating and covering my innards with cheese, chocolate and butter, these Korean style noodles feel like an almost instant cleansing ritual. They taste fresh, spring like and the sharp spicy flavours almost feel like they’re exorcising all the fat away.

The reason I call these Korean style noodles and not Korean noodles is because they aren’t. This is a recipe that was created by moi, after I fell in love with and bought a big vat ofย Gochujangย .ย It’s a Korean hot pepper paste, so vividly red and so flavourful that I’ve been adding it to almost everything I cook nowadays. After a stroke of greedy inspiration I came up with this noodles recipe, and as usual this is a recipe so forgiving and delightfully easy that you can make it your own using whatever ingredients you have handy and your fridge has to offer.

DSC_0709wthe ingredients are rather humble and easy to find. Chives, spring onions, chili, mushrooms, ham, chicken stock (I’m using powder you can use regular stock), gochujang and noodles. (also not pictured are soy sauce and sesame oil..sorry!)

These noodles here are something called (Hongshu Fen) sweet potato noodles. They’re a very popular noodles type from the Chinese province I live in (Hunan), but you can use any noodles that you have/find. I just happen to have/love these and that’s what I’m using.

DSC_0712begin by chopping your spring onions and chives and reserve the dark green parts and keep them separate.

DSC_0713chop your chillies.

DSC_0716chop your mushrooms and try to keep them into equal sized chunks.

DSC_0718nice pile of vegetables. I feel healthy already.

DSC_0719chop your meat..er.. ham! I shopped mine into fairly small squares because I was feeling so efficient.

DSC_0720now put your noodles to boil and here’s a close up of these noodles. They’re translucent and silky.

DSC_0722see what I mean. slippery noodles! yum!

DSC_0723once boiled, strain and remove them to your serving bowl.

DSC_0725add in the reserved greens from onions and chives and splash a bit of sesame oil. ah, this aroma.

DSC_0726find your favourite, most used, most tragic looking wok and pour in some oil

DSC_0727once it’s really really hot, throw in your vegetables

DSC_0728give them a good mix for a minute.

DSC_0730pour in some soy sauce

DSC_0732and finally, for the star of this show…our red as hell gochujang.. yummm

DSC_0733oooooh just look at this baby. There’s something rather poetic about the way it sounds and the way it gloops. oooh mama!!

DSC_0734mix it all until it’s red and looks dangerously tasty.

DSC_0735finally in with the ham.

DSC_0737add in your chicken stock if you’re using, I simply poured in hot water and added the chicken stock powder I had.

DSC_0739let it all come to a bubble like so.

DSC_0746and then pour it on your noodles to get this!! yes my lovers this is better than that, and any of that you were thinking of making because this has a kick, it’s a storm, it’s fire, it’s tangy, it’s full of such beautiful layers of flavours that you’d be reeling your head and wiping your tears of joy and some sweat.

Make this!!

Ingredientsย 

Gochujang: 2 tablespoons

mushrooms: 3-4 large

spring onions: 4-5

chives: 3-4

red chili: 1

ham: 3-4 slices (or use meat of choice, boiled chicken is good or leave out the meat and make it vegetarian)

chicken stock: 350 mls (1.5 cups)

soy sauce: 2 teaspoons

sesame oil: 1 teaspoon

noodles: 1 nest

oil: 2 teaspoons

salt to taste

Cooking instructions:ย chop the vegetables and ham into small dices keeping the mushrooms a bit chunky. Reserve the green parts of the chives and spring onions.

Boil the noodles strain the water and keep in serving bowl. Add in the reserved greens and pour over the sesame oil.

In a hot wok add oil and once it starts shimmering add in all the vegetables and cook for a minute. Add the soy sauce and gochujang and cook for a minute. Add in the stock and let it come to a boil.

Pour this over the cooked noodles and serve hot.

DSC_0743enjoy!!

Chinese spicy fish Hunanese style


DSC_0136

This right here is a fish. This fish is adorned with everythingย chili. The reds and the greens are just variants of chili.

Before I begin this post, let me tell you exactly why there are so many chillies in, and on the fish. I live in the wonderful Hunan Province in China, where the food is soul witheringly hot. It’s so spicy that your intestines beg for mercy, your tongue commits hara kiri and your lips give up on you. It’s so maddenigly hot that the tears from your eyes are just the beginning. It’s the food that all Hunanese people take pride in and the unbelievable part is that it is absolutely addictive. Once you’ve eaten a tear inducing morsel, you wouldn’t stop. You would be in danger of being disoriented but you will keep shoveling it in your mouth. It’s a perfect blend of extreme spice, vinegar, salt and LOVE. Of course you’d hate your macho instincts next morning.. just saying…

This fish and a lot of other Hunanese speciality was ย prepared by my dear friend ‘Nana’ and her husband ‘Mr. Ye’ who always invite us (i.e le moi and the vegetarian husband) to treat us to some of the most extreme yet exciting and delicious food.

DSC_0072My friend Nana

DSC_0088her husband Mr. Ye aka the talented cook

DSC_0099the poor dead fish that was to be cooked. It was a huge monster really.

DSC_0095industrial quantities of dried red chillies (incidentally also the name of this blog)

DSC_0094Enough garlic is also not enough. as many garlic cloves you can find

DSC_0090Green chillies, as many as you can feats your eyes on. this recipe has no moderation. You can make it as spicy or as non spicy as you want. Though the spicier the better.

DSC_0102the fish had to be cut, because it was too big for even the big wok.

DSC_0103Into a very hot wok with a generous amount of oil.

DSC_0104It sizzled I tell you, it sizzled so loud I couldn’t her my phone ring. This was cooked for about 5-7 minutes per side

DSC_0112Cooked side up. All this was happening pretty fast though. The wok was being shaken, the fish being rotated, the sizzling and the smoke and the typically Chinese expertise in lifting the wok every some time from its extremely high flame.

DSC_0116The fish is almost done on both sides.

DSC_0118The mangled fish. Admittedly not so pretty but this isn’t nearly done. The tail is given the same treatment and removed onย a plate.

DSC_0124This is the seasoning, the spice, the soul of the fish.

Once the fish including the tail was entirely cooked, it was removed to a plate and into the remaining hot oil some water was added along with the dried red chillies, salt, some chicken stock granules and garlic

DSC_0126A good stirring and some soy sauce, vinegar

DSC_0127back in with the fish and the tail

DSC_0128making sure the fish is well rested on the chillies.

DSC_0129ย Mr. Ye added a big of glug of ‘baijiu’ which is a Chinese alcohol (it’s 51% alcohol), extremely strong and crazy. He told me Vodka would work just as well, and I believe a man who handles a wok on fire with such grace.

DSC_0130Soon enough the lid was clamped on for about a minute, nothing more.

DSC_0135Unveiling of the done fish. He didn’t think there were enough chillies, so he added another 30 grams worthย vinegary red chillies.. For aesthetic purposes you see.

DSC_0136This is the fish now done. Oh so spicy, so colourful, so wonderful, so bold and so addictive.

This recipe is really nothing defined, once can actually prepare according to your love for the spices. In case if you’re not into chillies then really this isn’t for you at all. However if you happen to love the hot stuff, by all means make it and you will not regret it.

Ingredients

whole fish of your choice. (cleaned and deboned mostly)

dried red chillies chopped coarsely 20-25 pieces

garlicย crushedย and sliced thin 8-10 cloves.

green chillies sliced thin 10-12 in nos.

Spring onions cut thinly 2-3 in nos.

oil at least 40 mls ( roughly 2.5 tablespoons)

salt to taste

water or chicken stock 100 mls

Chicken stock granules 15 gms (omit if using chicken stock)

vinegar 10 mls (2 teaspoons)

soy sauce 10 mls

baijiu or vodka 30 mls

Recipe: ย in a large wok enough to accommodate the fish, heat the oil on a high flame. The oil should start smoking, then add in your fish and cook both sides until almost done.

remove the fish onย a plate and in the oil add the chillies followed by the water or chicken stock and let it heat. Add in the garlic, salt and chicken stock (if you are using water). Stir around and don’t let the heat drop, the wok should be fairly hot at all times. If the water evaporates add in more but keep enough to not let anything burn.

Put the fish you’d removed back into the wok, placing them atop the chillies and the thin coating of sauce.

Pour in the alcohol and let it bubble and catch fire.

Clamp on the lid for roughly 1 minute, throw the spring onion on top and serve hot and eat with rice.

Disclaimer: Prepare this fish at your own peril, for this is ferociously hot. Keep a very cold beer upon your person while feasting on the beast. A tub of ice cream is highly recommended post this debauchery.

– Also you can adapt this recipe to suit your spice needs, you can go for mellower chillies, reduce the quantities of chillies etc., but for the full on flavour and a kick to your sensesย prepareย it just the way Mr. Ye did.

Enjoy!!

Spicy masala cookies


CSC_4925


For some reason these harsh winters have put me in a cookie mode. I’ve been buying, eating and baking cookies. But aha.. these are not sweet cookies but salty spicy ones.. well not spiky salty like chips or crisps but very mildly saltish to the taste with a twang of spice. The spices being rather mellow, subtly biting and very addictive.

I had no recipe to start these cookies with so I was just trying and testing in the kitchen butย accidentally or rather Fortunately these cookies turned out excellent. They tasted exactly how I wanted them to and I penned down the recipe and I’m sticking to it. I am !!!

Since these were just testing I didn’t bother with making a huge batch. You can easily double or triple the amount. These cookies are not thick and big, but dainty and petite which makes them all too easy to eat.

CSC_4917


see !! not fat at all..

Ingredientsย 

70 gms butter (you can also use salted butter for these cookies)

1 egg

1 tbsp sugar

2 tsp salt

125 gms flour

SPICES

1 tsp cumin seeds

1 tsp mustard seeds

4-5 curry leaves

1/4 tsp freshly ground pepper

1/4 tspย chillyย flakes

RECIPE

In a dry pan fry the spices (except pepper and chili flakes) for a couple of minutes until browned. The mustard seeds will starts spluttering and you will get the most heavenly spiced aroma. Make sure the pan is dry. You don’t need to add any oil.

Once the spices are browned and giving off their aromatics take the pan off the heat and crush the spices. You can do these win a mortar & pestle. I used my rolling-pin. Keep these aside.

In a large bowl beat the butter with the sugar and salt for a minute or so. add in the egg and beat again.

Now add the crushed spices along with the pepper and chili flakes and beat until the spices have turned your beautiful yellow butter to tarnished brackish spiced goodness. ย Add in the flour, and at this moment its best to use your spatula or wooden spoon to incorporate everything together.

Once it has formed a sort of dough and you can see the flecks of spices dotting your mixture, believe me it only gets better now.

Roll this cookie dough on a lightly floured surface. You can make these cookies fat or thin, depends how you like them. I roll them out quite thin perhaps 1 cm or less (you can see in the picture above)

Once they’re rolled out you can use any shaped cookie cutter and stamp out shapes. You can make them round or just basic square.

Place them on a sheet. These cookies don’t spread, so you can space them close.

bake in a pre heated oven at 180โ„ƒ for about 12-15 minutes, or until the edges have browned slightly. It also helps me to rotate the cookie sheet after 8 minutes or so.

Let them cool slightly and they are ready to eat.

You can either eat them on their on as they are or even use some dip or salsa or even this hummus

CSC_4913


Another picture to inspire you to make these immediately..

Enjoy !!!

South Indian Sambhar


Image

Sambhar is a very popular South Indian vegetable stew/broth/curry.. whatever you might want to call it..ย  Subtly sour, full of vegetables, low calorie, and the greatest accompaniment to rice

This dish has so many different ways of making depending upon where it’s made. This recipe right here is how my mother makes it, without using those boxed sambhar masala’s. I don’t really like that flavour, and this is how I have eaten this dish forever. No, I’m not some sambhar purist and It’s entirely up to you to use a packaged masala.. But this is the way I roll, or rather my mom did, and trust me you have to taste this to know how fantabulous this actually is.

Image

Vegetables!! The main ingredient. I have used beans, green peppers, brinjals. You can easily use any vegetables you like, drumsticks, cauliflowers etc etc.. whatever you want- the onions and tomatoes are a must.

Image

these are 200 gms of pigeon peas (split toor dal). These form the base of our sambhar.

Image

Into a deep pot, put in all the ingredients. The chopped vegetables, the lentils and add the water. This will be 600mls of water.

Image

Now the spices. 1/2 tsp asafoetida powder. (hing)

Image

1 tsp turmeric powder. It does bring out the yellow, and oh boy, yellow it is.

Image

salt- a little short of 1 tbsp. It’s a lot of sambhar, and under salted food is vile.

Image

Mix them all together now and put it on a boil. We need the vegetables to be well cooked, in fact softened and almost not blended. Also the lentils do take some time to cook. I boiled them for about 40 minutes.

Image

Now for part 2. and this is what makes this dish truly South Indian. These spices, sort of form the soul of this food. I have here 4 cloves of garlic. 1 tbsp of coriander seeds, 2 tsps fenugreek seeds, 1/2 cup shredded coconut.- If miraculously you happen to have fresh coconut, then nothing like it.

Image

Into a very hot tablespoon of oil, add in the garlic cloves

Image

Going next are the coriander seeds and the fenugreek.

Image

in goes the shredded coconut

Image

keep frying them all together until the mixture turns brown, like so. Now this is when your house house will smart smelling like a spice incense. It’s heaven I tell you.

Image

Into a blender they go. Mix in about 1 tbsp of water so that everything comes together beautifully.

Image

This is what the blend looks like.

Image

Now if you wish to make your dish more spicy, add in some ground red chillies (completely optional). usually one adds dried red chillies before blending, but since my husband is not a friend of the spicy stuff, I like to do this to control the chilli.

Image

The final blend.

Image

The last in line of taste and aromatics. I have some curry leaves. It’s a handful really. But in case you have the fresh stuff 8-10 leaves will do. Also 1 tbsp of tamarind paste. This tamarind gives the sambhar its distinct subtly sour taste.

Image

The unveiling of the vegetables and lentils. I cooked them for about 40 minutes and this is how they turned out. The vegetables were soft and mushy in golden yellow curry and the salt was just fine.

Image

Remember the blend from the coconut etc. .. well, it’s time for it to meet its destiny. In it goes in the lentil and vegetables mixture.

Image

the curry leaves go in.

Image

Finally the last ingredient- the sour tamarind paste. This all needs to cook again for another 10 minutes, before you serve it piping hot with rice.

Image

Here we go- the moment of TRIUMPH. Doesn’t this look gorgeous? It tastes even better. The best part about this recipe is that it’s not heavy, its not very oily and it can be eaten just like that- as a sort of soup. I love it, and so will you..Enjoy !!!!!

Ingredients

200 gms of pigeon peas (split toor dal)

chopped vegetables of your choice.

1 thinly chopped medium sized onion

1 thinly chopped medium sized tomato.

600 mls water

1/2 tsp asofoetida (hing)

1 tsp turmeric powder

1 tbsp salt

1 tbsp coriander seeds

4-5 cloves of garlic

2 tsps fenugreek seeds

1/2 tsp crushed red chillies (optional)

1/2 cup shredded coconut

1 tbsp oil.

8-10 curry leaves

1 tbsp tamarind paste.

In a deep pan mix the chopped vegetables, onion, tomato, water, asofoetida, salt and turmeric. Cook them on medium flame for about 35-40 minutes (covered) or until the lentils are cooked and the vegetables mushy.

In a separate pan, heat the oil, tip in the garlic, fenugreek and coriander seeds, coconut. Fry until it’s all golden brown. Once these spices are golden and fragrant, blend them with a tbsp of water. Add crushed chillies as per taste- they’re completely optional.

Into the pot of cooked lentils and vegetables, add the blend of spices, the curry leaves and the tamarind paste.

Cook for another 10 minutes.

Serve warm.


Way too easy macaroni


Home alone, hungry and too lazy to make anything extravagant & in reality not interested in distracting yourself when your favourite movie is on..

Wat do you do? cook something when the commercial break is on.. This is the easiest in fact too embarrassingly easy and crazy delicious version of the lazy wife macaroni edition..

This post doesn’t have the cooking instructions and picture tutorial, for the reasons that I didn’t have my camera on me and that it was almost too lame to put the pictures of a hot skillet and boiling noodles.. really it was that easy..

Ingredients

macaroni/pasta noodles – depending how hungry you are.. I used 3/4 cup

2 tsp olive oil

1 clove crushed garlic

1 tsp salt

1 tsp turmeric powder (completely optional)

1 tsp chilli flakes (cuz I needed some bite & kick)

Boil your noodles according to package instructions

Heat the oil and add in the garlic, turmeric, chilli & salt and tip in the macaroni.. and that’s it. I got this big bowl and finished it in no time. So basically it took two commercial breaks.. in one I put the macaroni on boil and in the other I made everything else.. Seriously that easy..

Enjoy!!!

Vegetable Kofta Curry- one word.. DELICIOUS!!!


Kofta’s are one of the most mouth water inducing recipes from Indian kitchen’s. Loved by all, and cooked to celebrate special occasions, or a sometime treat or just celebrating the onset of a weekend, which is why I had cooked it. It’s rich, it’s spicy and unbelievably flavourful. The process though elaborate is hardly difficult. If I can make it anyone in this galaxy can..

It’s got a couple of steps, since it involves two stages-1) curry & 2) Kofta’s (spicy fried vegetable balls)

So we start with step 2. i.e. the making of the kofta’s.

Assemble your ingredients- for the kofta making you will need.

-1. Oil for deep frying

-2. Boiled potatoes mashed 1/2 cup

-3. Steam and water drained bottle gourd1/4 cup

-4. Paneer 2 tbsp

Before proceeding, lets figure out how we can completely drain the gourd of it’s water.

take the gourd and grate it well. If you’re like me- keep a band aid handy.

this is what the green mass of the gourd will look like.

throw it in a deep pan- mine looks like a well, but yours doesn’t need to. Throw it in without adding any water- keeping the heat on very low cover and cook for not more then 10 minutes.

After 10 minutes you’ll see all this water accumulated in your pan or well in my case. We need to separate that- take a cheesecloth or any fine cloth and drain, squeeze it using your hands, but please let this stuff cool down first or wear gloves. squeeze out all the water- any moisture ad it will refuse to bind completely, and we don’t want to fry a mess of green mass.

This is what it will look like after draining out the water. You will realize the mass has reduced. fret not.. it’s A-OK..

This is our line up of ingredients for the Kofta’s. Boiled & mashed potatoes. I used some leftovers from the Aloo Parantha but you can always just use your boiled potato mashing it well, and the white wodge of beauty is Paneer of course. (you can refer to my Paneer making 101 post).. well that’s it, mash them all together, using 1tsp salt, 1 tsp ground coriander, 1/2 tsp red chilli powder.

This is what it’s all going to look like once we have mixed it well.

Scoop out small bits of this mixture and using your hands roll them into balls or these cylindrical little babies. I always make them this way cuz my mom always made them so, and they taste amazing and I miss my mom now…

That’s it, heat your oil, and deep fry these little green monsters until they’re golden and crispy.

Drain them on a paper towel resist the urge to eat them. they’re perfectly edible this way with some ketchup. great snack or beer companions.. I had 4 .. No I didn’t eat any.. yes I did.

This is it.. the Kofta part is done. Going to the curry. easy as a breeze. get your blender ready.

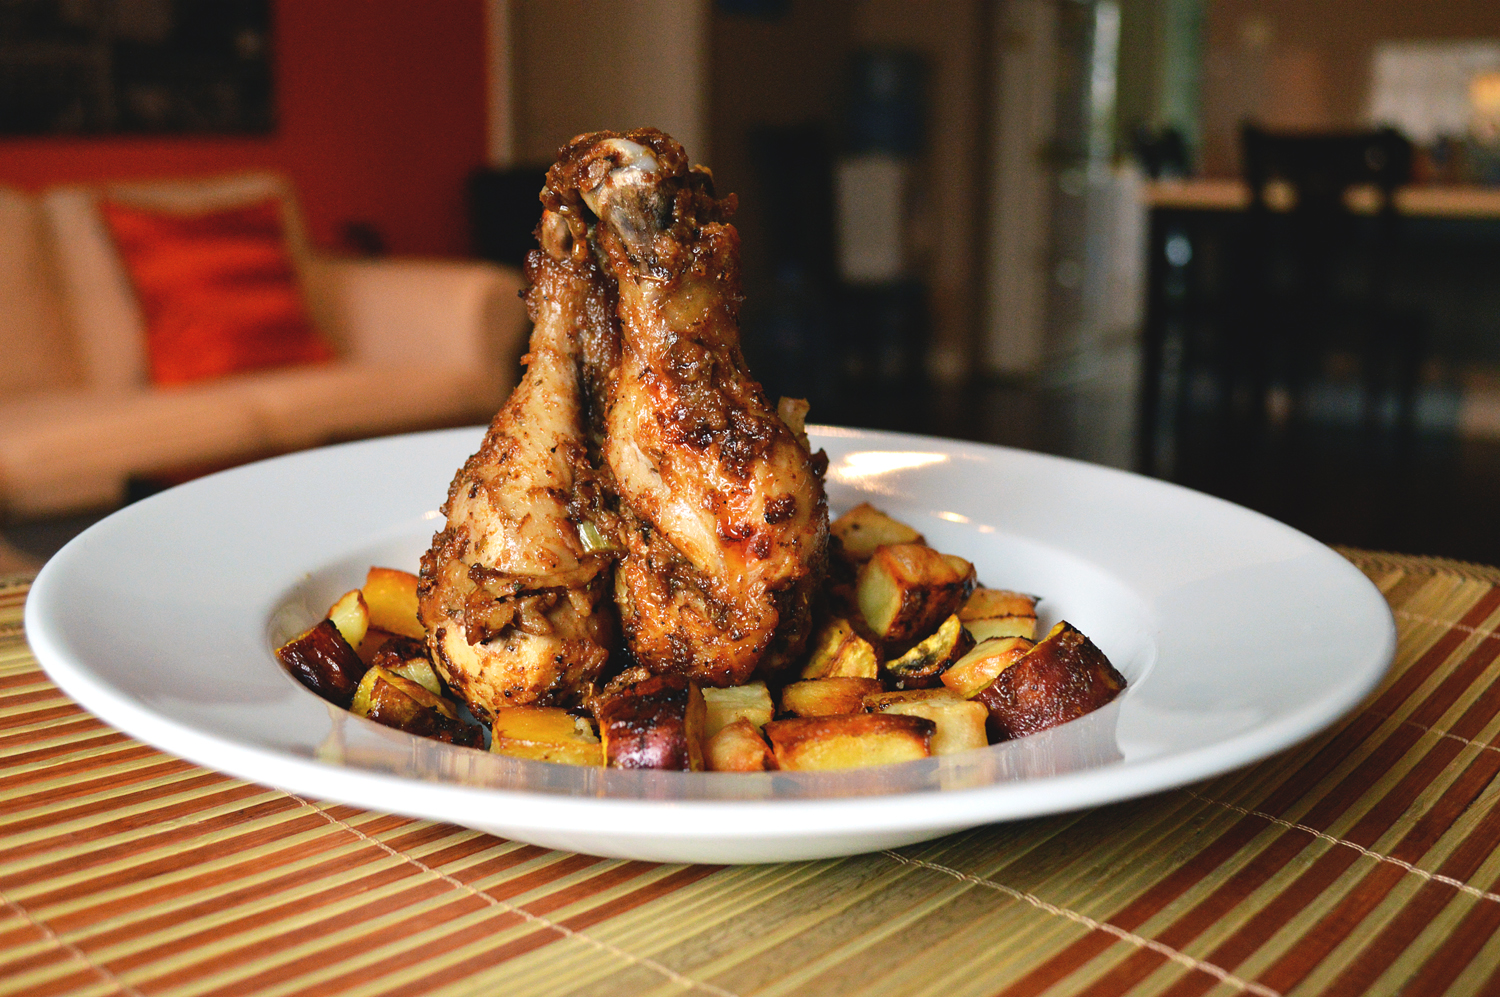
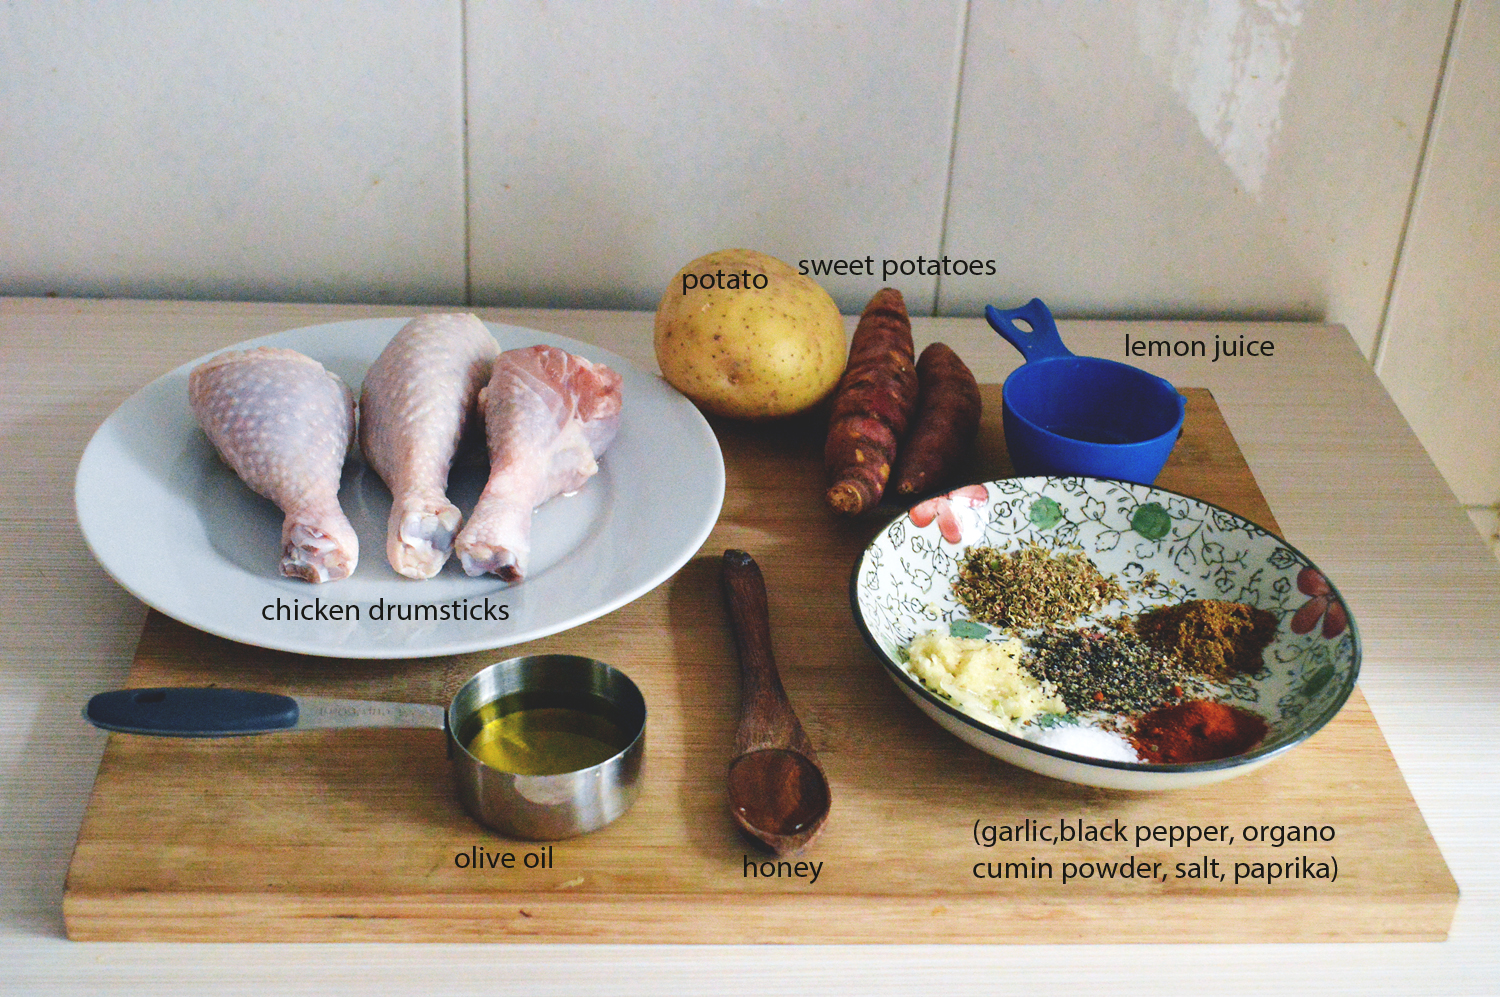
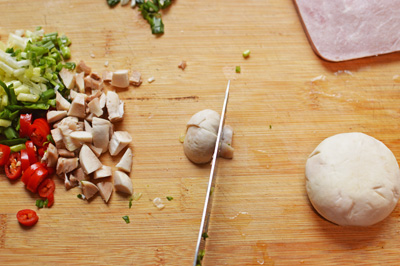
This is the line up of the curry ingredients. 1 big fat onion, 1 not so fat tomato red as blood, 2 green chillies the spicier the better, 3-4 garlic cloves, 1 inch ginger.. Blend it all together.

fresh out of the blender and a mess on my kitchen counter. this is what it will look like.

There isn’t more to it now. take 2 tbsp oil from the leftover oil used for frying. take a pan/wok heat the oil and add in 1/4 tsp of cumin seeds, 1/2 tsp of freshly ground black pepper & the paste .

This is what it’ll look like while it’s cooking. Give it around 10 minutes to completely cook. You’ll know it’s cooked when you feel like dipping your face into the curry. resist the urge- no good outcomes.. trust me.

Here it is, now completely cooked. Blistering red and flavorful. Add in 1/2 tsp turmeric, 2 tsp ground coriander, 2-3 tsp salt (depending on your love for salt), 1/2 tsp cinnamon, stir and let cook for another few minutes.

Finally add in water arund 250 mls, give it a good stir to combine with all the paste, check to taste, and add in salt according to your taste. add in 1/4 tsp of sugar to balance out the salt and spices and when almost done, add in the kofta’s and cover for a few minutes before serving.

Serve with rice or bread and dive in.. It’s so pretty and sooo tasty.

Ingredients

For the Kofta’s

1/2 cup boiled mashed potatoes

1/4 cup bottle gourd grated and well squeezed

t tbsp paneer

1 tsp salt

1 tsp ground coriander

1/2 tsp red chilli powder

Oil for deep frying

mash together all these ingredients. Using your hands scoop them and make into small balls. Fry them till deep golden and drain on a paper towel.

Curry:-

1 large onion

1 ripe red tomamto

1 green chillies

3-4 cloves of garlic

1 inch ginger.

2-3 tsp salt

2 tsp ground coriander

1/2 tsp cinnamon

1/4 tsp sugar

1/4 tsp cumin seeds

1/2 tsp fresh ground black pepper.

1/2 tsp turmeric

200 mls water

2 tbsp oil for cooking.

Blend together the onion, tomato, garlic, ginger and chillies to a smooth paste. Heat oil in a pan, once hot add in the cumin seeds and the pepper. Once they start sputtering tip in the blended paste and let cook till the oil starts separating or the mixture turns deep red and brown. Add in the turmeric, coriander powder, cinnamon powder, salt and stir to combine and let it cook for another few minutes. add in the water and mix well into the paste. let it bubble a bit and add in the sugar. Cover and cook for a few minutes and finally add in the Kofta’s draining on the paper towel. Cover for some time before serving with rice or breads..

Enjoy !!!


Egg Curry


This happens to be one of the only egg recipe my militant vegetarian husband seems to like. It’s spicy, warm and can be eaten with bread, rice or just as it is.

Before you get started with it, get the eggs to start boiling.. and we need hard boiled eggs. enough to crack open your enemies skull. (I’m listing the ingredients towards the very last of this post)

Into a blender put in 1 onion, 2-3 cloves of garlic, 1 green chilly, 1/2 inch of ginger and blend into a frenzy.

this is what you’ll get after blitzing it all together. A very nice and grainy paste.

heat 1 tbsp oil in a wok and pour the puree into it and let it cook. In the meantime lets get on with the rest of the ingredients

yup, that’s my reflection.. I’m glad we’re over it. One ripe tomato and a grater, we reduce this to a nice pulp minus the skin ahem!!

Here it is, the glorious, red tomato pulp.

In the meanwhile, we have the onion, garlic and ginger puree now cooked and ready for the grated tomato pulp to be added in.

The gravy is turning a brilliant red after adding in the tomato. I have let it all cook for 5 minutes and added in the salt and given it a good stir. Make sure that you have cooked it all through before you add in the spices.

1 tsp of dried coriander into the cooked tomato onion gravy..

1/4 tsp cinnamon for the brilliant aftertaste.. cinnamon has to be my favourite spice hands down!!!

1/2 tsp ground cumin. Stir it all together and let it cook a bit

Finally, 200 mls water to the whole paste.. this is what turns it all into a wonderful curry..

Let it cook and froth and spurt and boil for another 5 minutes

The last & final addition of eggs into the curry, after which just cover and simmer for another 5 minutes..Do keep checking it by tasting it for salt.. we all have different love for salt

This is it.. The wonderful egg curry.. it’s one of the my favourite ways to eat up an egg.

Enjoy !!!

Ingredients

3 hard boiled eggs

200 mls water

2 tsp salt

1 tsp dried coriander

1/4 tsp cinnamon

1/2 tsp ground cumin

1 tbsp oil

1 ripe red tomato

1 medium size onion

2 cloves of garlic

1 green chilly

1/2 inch ginger

Blend together the onion, ginger, garlic and chilly and heat oil in a wok and pour out the paste into it and let it cook. You’ll know it’s cooked when it starts separating from the oil & in case you have used too less an oil to separate then wait till it turns completely brown, not burnt !!

In the meanwhile grate your tomato into a pulp and add it in the wok. Cook it through and add in the salt, proceeding with the ground coriander, cinnamon and cumin. Mix it all well and let cook for another few minutes.

Finally add in the water. Cover and cook till it boils. carefully add in the eggs and cover and cook again.. we really ant the eggs to sort of imbibe and take the curry’s colour.

That’s it,serve with rice or just have it the way it is..