Buns Buns Buns !!!!!!


These blistered little babies were made when I realized there is an overflow of yeast in the house and that I really needed to bake something new..

sadly I don’t have the pictures of this entire process because I remembered it all while I as actually kneading the dough and it was not a great idea to click pictures with those hands.

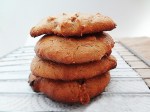
I have however got the recipe and all you gotta to is follow it and watch the miracle happen. These Buns are soooooo soft with a slightly blistered top which adds so much texture.

Ingredients

1.5 tsp active dry yeast

1.5 cup flour

2 tsp sugar

100 mls lukewarm milk

1/2 tsp salt

1 tbsp milk extra

Very easy and no fuss. Guaranteed bouncing beautiful buns in 2 hours..

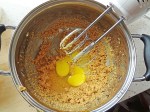
Mix in the yeast and sugar with the flour and let it be a couple of minutes. Add in the salt and mix through. Now slowly pour in the milk into the flour yeast mix and gently using your hand mixer or stand mixer or simply your hands knead it well. It should become smooth and stretchy.

Now let this dough rest until it doubles in it’s size and btw cover the dough while it rises.. we do not want the top all dry and ugh!!..

After an hour of rising give it a good punch and let it deflate.. don’t worry it’ll rise back up. Another 45 minutes later we get this dough out and scoop out small balls. I didn’t try to make these perfect round balls, but if you’re a sucker for uniformity go ahead and knock yourself out.

Line them on your baking sheet, not too close to each other. Now for the blistered top, instead of an egg wash I drizzled the tops with some milk and let them be for another 15 minutes to rise a bit more. Before putting them into the oven brush their tops again with some milk and that’s all. I drizzled some flecks of salt on top too.. you can actually mix and match and put flakes of red chillies or basil or herbs DE Provence or whatever gets your ship sailing or just leave it plain.

Bake at 190℃ 18-25 minutes. that’s all..It’s heavenly. lather some butter, immerse yourself..

Enjoy !!!


Masala Pockets


A spicy alternative to the same old buns.. the premises are the same, only the ingredients slightly altered to give the most loved tea time a spicy twist. Easy and made within a couple of hours. These tasty treats don’t last too long.. addictive and yummy!!!

A humble line up of: Ingedients

1 tsp active dry Yeast

1medium size onion

2 cloves of garlic

1/4 tsp of red chilli powder

90 mls lukewarm water

1 tsp sugar

1.5 cups white flour

2 dried red chillies (of course)

1 tsp salt

1/4 tsp black pepper powder

1/2 tsp ground cumin

Dissolve the sugar into the lukewarm water and ad in the yeast and stir to mix it through and let it be for 15 minutes..

In the meantime get your onions, chillies and garlic chopped..

Mix these ingredients with the spices into the flour (no pictures my hands were covered with the goods)

You can use a mixer or simply use your hands if you need the work out.. apparentluy I always need the work out..

Once its all combined let it rest and a well oiled bowl for an hour until it starts poofing up and is almost ready to spill out of the bowl

Scoop out small balls from the dough, rolling and gently pressing to flatten out and let them rest again for 15 odd minutes to rise a bit more before you put them all into the oven.

15 minutes later, put these little babies in to bake at 195℃ for 15-20 minutes depending on your oven.. mine took exactly 18 minutes and came out this beautiful golden colour..

Let them cool before you start biting through.. make yourself a nice cup of tea and reflect when was the last time you had such beauties so bronze and spicy.. bliss !!!

Here.. reflect on them from another angle…

Peanut butter & snicker cookies


As I mentioned earlier in my posts, I’m currently residing in a small town in China which is a little scarce in the kind of foodstuffs we are usually used to. It isn’t such a big problem though but the biggest issue I face is— wait for it… NO BUTTER !!!!!! none… there are 2 walmarts here and none sell butter, because its not such a big deal here and no one cares for butter.. no one buys it and no one eats it.. so basically it’s been a month and we haven’t had any butter.. ahh the food of the gods.. we’re waiting for the summers to go down a bit and maybe then we’d be able to go out to another bigger city and buy a couple of tons for the winter hibernation.

Soon enough I was facing cookie and cake withdrawal. I needed to bake a batch and soon.. hubby was getting impatient and I was twitching, missing the surplus and the comforts of some homemade cookies, which is when I finally decided to take charge and make do with whatever little I had. There was nothing to lose after all. Considering it’s just the two of us I didn’t even need to make a lot, and this experiment couldn’t really go wrong when you have peanut butter and snickers involved.. I mean seriously, whats the worst that could happen?

The experiment proved successful and I had me over a dozen cookies (15 to be precise)..

Here’s how I did it..

Ingredients

½ cup sugar granulated

2 eggs

1 cup flour

1 tsp vanilla essence

½ tsp baking powder

I regular bar of snickers (cut into small tiny pieces)

½ cup peanut butter

With a hand mixer or a stand mixer,cream the butter and sugar together with a frenzy you’d never known before. Add in the vanilla essence and fluff it up some more. Add in the eggs and beat again finally adding in the flour and baking powder and beating it together.

Once it all comes together you finally add in the snicker pieces and give it one last mix. I refrigerated mine for 15 minutes before putting them on my baking tray. You can just put them as it is. bake them at 200℃ for 6-8 minutes depending on your oven..

In my cookies the snicker pieces arent too visible on the outside but you can see just a teeny bit of nougat melting out. I cut my snickers pieces too small, you can cut them up according to your choice..

Enjoy..

Homemade easy crusty bread


Is there anything more liberating than baking your own bread? The moment you’re aware of the fact that you can bake your bread, you stop going to the supermarket to buy any.

We were facing a couple of problems with bread since as I have earlier mentioned that I’m living in a small town in China with limited options and availability, the breads available here though abundant aren’t the ones we’re specifically looking for. Mostly sweet or stuffed with meat, which puts me in a spot because hubby is a strictest of the strict vegetarian… sigh..

To resolve this situation and get custom made bread tailored to our needs (garlic/basil/cheese/oregano etc etc) I decided to cut to the chase and just bake one and finally omit the everyday early morning breakfast pop quiz.

Since it’s just the two of us I didn’t make a whole lotta bread, but the tiny loaf that I did make will last a almost 4-5 days by the end of which I’d be blogging about some other bread.

anywho’s.. the beautiful crusty bread.

Ingredients

1.5 cups white flour

1/2 tsp salt

1 tsp active dry yeast

90 ml lukewarm water

1 tsp sugar

2 tbsp olive oil

Incredulously easy bread making..

in a small bowl mix in the water with the yeast and sugar and stir all to dissolve. let it stand for 10-15 minutes until the water starts bubbling.

In your mixing bowl add the salt to the flour and mix it, gradually add in the yeasty water and start mixing either by hand or your mixer. I did it with my hand thinking I’d probably lose a few calories before eating the bread.

It should for a very nice smooth, and stretchable dough. That’s it, you need to now rest and put the dough in some place where it will start rising. oil that utensil with the olive oil and cover with a cling film also oiled well so the dough doesn’t stick to it. I love watching the dough rise in every half hour interval.. these little yeasts do a good job, don’t they?

well let it rise for 2 hours..I was impatient so let mine rise for 1.5 hours. Take it out of its bowl and form it into some ovalish shape you’d want your bread to be. I flattened mine a bit from the top and again let it rise COVERED for another 25 minutes.

That done.. just bung it into the oven at 200℃ for 20-25 minutes depending upon the oven and how hardcore you want its crust to be.

Once done, pull it out, resist the urge to munch through it, or run a knife through it or embrace it. You’d know your bread is done when you knock on it bottom side to hear a hollow sound. Let it rest and VOILA !!! ze bread of ze dreamz..

Enjoy..