Masala Pockets


A spicy alternative to the same old buns.. the premises are the same, only the ingredients slightly altered to give the most loved tea time a spicy twist. Easy and made within a couple of hours. These tasty treats don’t last too long.. addictive and yummy!!!

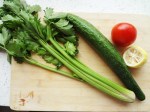
A humble line up of: Ingedients

1 tsp active dry Yeast

1medium size onion

2 cloves of garlic

1/4 tsp of red chilli powder

90 mls lukewarm water

1 tsp sugar

1.5 cups white flour

2 dried red chillies (of course)

1 tsp salt

1/4 tsp black pepper powder

1/2 tsp ground cumin

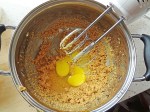
Dissolve the sugar into the lukewarm water and ad in the yeast and stir to mix it through and let it be for 15 minutes..

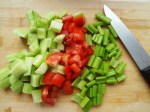
In the meantime get your onions, chillies and garlic chopped..

Mix these ingredients with the spices into the flour (no pictures my hands were covered with the goods)

You can use a mixer or simply use your hands if you need the work out.. apparentluy I always need the work out..

Once its all combined let it rest and a well oiled bowl for an hour until it starts poofing up and is almost ready to spill out of the bowl

Scoop out small balls from the dough, rolling and gently pressing to flatten out and let them rest again for 15 odd minutes to rise a bit more before you put them all into the oven.

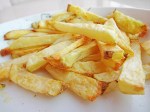
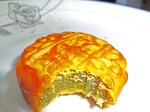
15 minutes later, put these little babies in to bake at 195℃ for 15-20 minutes depending on your oven.. mine took exactly 18 minutes and came out this beautiful golden colour..

Let them cool before you start biting through.. make yourself a nice cup of tea and reflect when was the last time you had such beauties so bronze and spicy.. bliss !!!

Here.. reflect on them from another angle…

Apple Pear Smoothie


This smoothie was a quick fix since I was feeling hungry, I didn’t feel like eating fruits alone, and I wanted to finish some leftover yogurt in the fridge, and I had to drink the glass of milk I had promised myself everyday..

So, instead of having it all separate, I might as well make something nice out of it.. and that’s how this smoothie came up.

It was unbelievably tasty, flavorful and healthy.. Took a total of 10 minutes, and I got two glasses out of it. Not too many ingredients required, and the best part is that you can change the fruits according to your requirements and availability..

Ingredients

1 apple

1 pear

2 packets of vanilla sugar (7.5gms each)- you can easily substitute vanilla extract for the same

250 mls milk

2 tbsp yogurt any flavour

1 tbsp sugar (not pictured) only if you need extra sweetness.

1 tsp blueberry or any flavor jam/jelly (not pictured).. this just brings some colour to it and an extra bit of flavor. you can easily omit it if you don’t want it.

I chopped my fruits because my blender starts acting crazy and refuses to blend fatter pieces.. it’s a bit of a nut my blender..

The rest of the steps are easy.. just put everything into the blender and blend till everything is mixed well and smooth. If you so wish you can even add in some ice cubes to the blender to have that gritty icy texture.. I didnt put any in mine, but it’s always an option.

This is a fantastic drink if you’re low on energy, low on activity and feeling lazy, or you need a quick drink before heading out to the gym or you need your kids to do some fruit eating and milk drinking. Wonderfully flavorful and Delicious…!!!!!!!

Easy oven baked fries


Alone, hungry, craving a fast fix to satisfy your fry cravings without bothering to heat up oil or feeling guilty about consuming tons of oil..

Oven baked fried are by the far the easiest, tastiest and healthiest solution. 3 ingredients and you’re done… yeah it’s actually that easy.

This recipe is according to one person, in case you want to increase the recipe just increse the number of potatoes and you’re done.

Ingredients

1 large potato

1 tsp salt

2 tsp olive oil

Slice your potato into thin, fries like wedges. (sorry I couldn’t click a picture of the same)

grease the oven tray with the olive oil and spread the fries on it, making sure they all get coated with the oil. just use your hands.. don’t worry, the oil will be enough to lightly coat your fries.

place your fries in the oven tray, separate and not overlapping to give the right crispiness to each individual fry.

bake them at 200℃ for 15 minutes.. once done let them out, cool them slightly and sprinkle salt.

These are by far the best fries I have eaten.. if you’re feeling a little festive sprinkle some garlic salt and indulge..

Peanut butter & snicker cookies


As I mentioned earlier in my posts, I’m currently residing in a small town in China which is a little scarce in the kind of foodstuffs we are usually used to. It isn’t such a big problem though but the biggest issue I face is— wait for it… NO BUTTER !!!!!! none… there are 2 walmarts here and none sell butter, because its not such a big deal here and no one cares for butter.. no one buys it and no one eats it.. so basically it’s been a month and we haven’t had any butter.. ahh the food of the gods.. we’re waiting for the summers to go down a bit and maybe then we’d be able to go out to another bigger city and buy a couple of tons for the winter hibernation.

Soon enough I was facing cookie and cake withdrawal. I needed to bake a batch and soon.. hubby was getting impatient and I was twitching, missing the surplus and the comforts of some homemade cookies, which is when I finally decided to take charge and make do with whatever little I had. There was nothing to lose after all. Considering it’s just the two of us I didn’t even need to make a lot, and this experiment couldn’t really go wrong when you have peanut butter and snickers involved.. I mean seriously, whats the worst that could happen?

The experiment proved successful and I had me over a dozen cookies (15 to be precise)..

Here’s how I did it..

Ingredients

½ cup sugar granulated

2 eggs

1 cup flour

1 tsp vanilla essence

½ tsp baking powder

I regular bar of snickers (cut into small tiny pieces)

½ cup peanut butter

With a hand mixer or a stand mixer,cream the butter and sugar together with a frenzy you’d never known before. Add in the vanilla essence and fluff it up some more. Add in the eggs and beat again finally adding in the flour and baking powder and beating it together.

Once it all comes together you finally add in the snicker pieces and give it one last mix. I refrigerated mine for 15 minutes before putting them on my baking tray. You can just put them as it is. bake them at 200℃ for 6-8 minutes depending on your oven..

In my cookies the snicker pieces arent too visible on the outside but you can see just a teeny bit of nougat melting out. I cut my snickers pieces too small, you can cut them up according to your choice..

Enjoy..

Bock choy stir fry


One of the perks of living in China is the vegetable market. Teaming with fruits & vegetables I had never usually seen before. A trip to the market is such a sight for sore eyes. Beautiful green vegetables, lush fiery red fruits.. initially all I did was buy dragon fruits by the tons and devour them in the privacy of my home.

Bok choy is one leafy vegetable I couldn’t have enough of. Wonderfully versatile and cooked within minutes. It’s easy simple and elegant on a plate. For the past week this stir fry has become sort of a staple breakfast- it’s easy, delicious, nutritious and a few drops of oil are more than sufficient.. i.e. healthy and low cal..

Ingredients

2-3 stalk of bok choy (see picture)

1 medium sized garlic chopped fine

1/2 tsp salt

1 tsp pepper

2 tbsp water

1 tbsp any vegetable oil

very easy & very quick.

Wash your bok choys thoroughly and cut the base of the stalks so that all the leaves with their stems are separate. Wash the vegetable and pat them dry on a kitchen towel.

In a non stick pan heat the oil and add the garlic. Let it almost brown and add in the bok choys. Now this is the best part, before you start wondering how will these leaves ever cook, they start wilting giving off the greenest sheen possible. Just stir it well to mix it with the cooking garlic and pour in the water…. this is almost done now. Just mix it all together and keep stirring it for not more than 2-3 minutes.

Add in the salt and pepper and give it a final stir.

Now stand back and look at it.. so green, so luscious, so beautiful..

Enjoy….

Homemade easy crusty bread


Is there anything more liberating than baking your own bread? The moment you’re aware of the fact that you can bake your bread, you stop going to the supermarket to buy any.

We were facing a couple of problems with bread since as I have earlier mentioned that I’m living in a small town in China with limited options and availability, the breads available here though abundant aren’t the ones we’re specifically looking for. Mostly sweet or stuffed with meat, which puts me in a spot because hubby is a strictest of the strict vegetarian… sigh..

To resolve this situation and get custom made bread tailored to our needs (garlic/basil/cheese/oregano etc etc) I decided to cut to the chase and just bake one and finally omit the everyday early morning breakfast pop quiz.

Since it’s just the two of us I didn’t make a whole lotta bread, but the tiny loaf that I did make will last a almost 4-5 days by the end of which I’d be blogging about some other bread.

anywho’s.. the beautiful crusty bread.

Ingredients

1.5 cups white flour

1/2 tsp salt

1 tsp active dry yeast

90 ml lukewarm water

1 tsp sugar

2 tbsp olive oil

Incredulously easy bread making..

in a small bowl mix in the water with the yeast and sugar and stir all to dissolve. let it stand for 10-15 minutes until the water starts bubbling.

In your mixing bowl add the salt to the flour and mix it, gradually add in the yeasty water and start mixing either by hand or your mixer. I did it with my hand thinking I’d probably lose a few calories before eating the bread.

It should for a very nice smooth, and stretchable dough. That’s it, you need to now rest and put the dough in some place where it will start rising. oil that utensil with the olive oil and cover with a cling film also oiled well so the dough doesn’t stick to it. I love watching the dough rise in every half hour interval.. these little yeasts do a good job, don’t they?

well let it rise for 2 hours..I was impatient so let mine rise for 1.5 hours. Take it out of its bowl and form it into some ovalish shape you’d want your bread to be. I flattened mine a bit from the top and again let it rise COVERED for another 25 minutes.

That done.. just bung it into the oven at 200℃ for 20-25 minutes depending upon the oven and how hardcore you want its crust to be.

Once done, pull it out, resist the urge to munch through it, or run a knife through it or embrace it. You’d know your bread is done when you knock on it bottom side to hear a hollow sound. Let it rest and VOILA !!! ze bread of ze dreamz..

Enjoy..

Refreshing healthy salad


There are time when  I do feel the guilt of stuffing my face with comfort food every now and then, and considering my laziness I try and cook up something relatively easy to lower the guilt meter.It’s at these times that this easy as nothing salad comes to mind. Few ingredients, fewer work steps and lip smacking, tangy, juicy and delicious and oh so satisfying, and yes.. I do feel healthy the moment I apply it to my face.

the best part of this salad is the beautiful colours and the juiciness they render and the crunch in your mouth is veryyyyy refreshing.

Ingredients

1 cucumber

1 ripe, red juicy tomatoe

3-4 sticks of celery, leaves removed.

chopped coriander (optional. I didnt put any in mine, but it gives wonderful flavour)

juice of 1 fat lemon.

zest from the same lemon

1/2 tsp salt

1 tsp pepper

1/2 tsp chopped basil dried (you can use fresh if available)

that’s all folks…

chop them vegetables into not very tiny pieces and not too sizeable chunks either. Big enough to look pretty and small enough to effortlessly enter your mouth.

in another bowl squeeze the lemon and mix in the lemon zest. add in the salt, pepper and basil and mix with a frenzy to form a juicy, tangy dressing.. yummm. my mouth started watering as I wrote this.

Spread this all over your chopped vegetables and mix well to cover each vegetable piece with this wonderful dressing. If you like more salt in your dressing go ahead and add some.

Once everything is incorporated dig in, and feel less guilty about the cheese macaroni you had last night.

Smashed potatoes for the lazy…


As an old habit, I usually boil and keep a couple of potatoes in the refrigerator. firstly its easy to conjure up any dish and secondly it gives me this satisfied feeling that at any given time I have readily available food I can eat, since I’m in love with potatoes and need just another excuse to put them in hot oil.. yum..

this recipe is not much heavy on the calories though, and is perfect when you’re really watching what you eat and for the times you don’t want to go through the trouble of cooking up something fantastic.

Ingredients

boiled potato – any kind actually

salt to taste

Italian seasoning

pepper

garlic salt

1 tbsp olive oil or any vegetable oil

– without peeling off the skins of your potato cut them into thickish slices, not very big but not too thin either. they should be smashable.

on the oven tray, spread the olive oil/vegetable oil using a pastry brush and thats all the oil we need.. (see healthy & tasty)

taking your potato pieces and laying them carefully at least a few inches apart from each other just smash them. You can use a potato masher, I used a big fat spoon. My potato masher was yet to be washed… too much work.

once you have them smashed, just sprinkle on some garlic salt, pepper, seasoning, salt and put the tray into the oven and under the broiler for around 15-20 minutes (depending upon your oven ) at 220℃.

that’s actually it.. once done just pull it out and Enjoy !!!

Chinese Moon Cakes..


we were strolling through Walmart the other day, since that being the only place in our current residing Chinese city where we could buy and read some labels on foodstuff.. we stumbled across these pretty packages dotted all over.

On closer inspection we found out that these were meant as gifts for the ‘Mid Autumn Festival’

Not knowing much of anything about this, and I mistaking it for a box of chocolates since it had the words ‘Switzerland ‘ written on the box with a pretty chocolate on one side, we decided to buy it and test them.

Only after reaching home did I read ‘Chinese Moon Cakes’ written all over it. Too late and too curious.. I unwrapped it to find the prettiest teeny tiny boxes, and withing it such beautiful, delicate and intricate looking cakes that I didn’t have the heart to bite through them.

Having not the slightest idea what they would taste like, I was blown away from the first bit I took. It was soft but dense, the flavours within it were unbelievable. I think I had bitten into the apricot flavour. It was subtle tasting, mildly sweet and addictive. WE finished off most of them, until right now that I bit into the green tea flavour and I knew this being the last had to make its way here.

Its elegant, beautiful and oh so pretty. In case anyone visits China sometime this year around, I’d definitely recommend these tiny treats..