Onigirazu two ways


crispy shrimp
avocado and veggies (vegan)

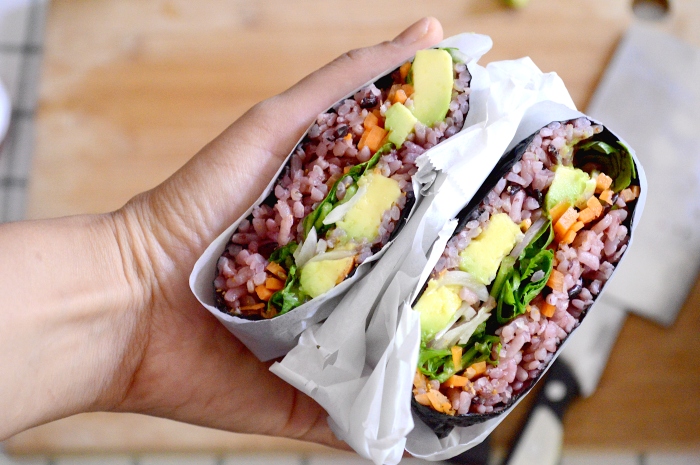
It looked like a magic trick the first time that I ever saw Onigirazu. It was a rice sandwich wrapped in nori that tasted like sushi from an alternative reality and what? how? dear god! was all I could exclaim.

Not only did it taste delicious but it looked so mind bending that I had to make it and just like a sandwich it can be created any number of ways to suit your mood and needs, which is why I have two kinds here. One is a crispy shrimp and the other a more sombered vegan option and they both turned out absolutely scrumptious.

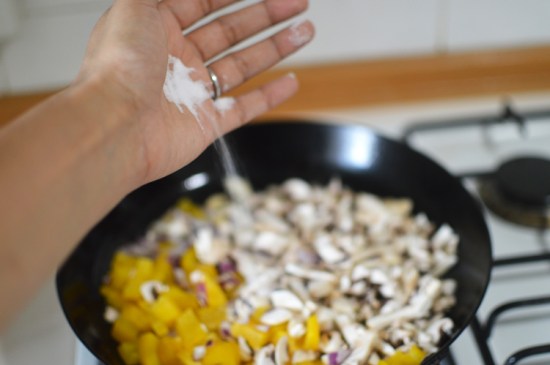
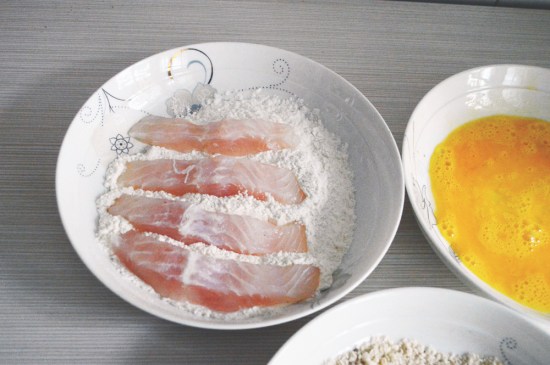
The ingredients for these particular onigirazu are thinly sliced vegetables (cabbage, onions, coriander, carrots), avocado and shichimi (optional) for the vegan option. Shrimps, semolina and paprika, salt, pepper, minced garlic, cumin and oregano for the shrimp option. Also Nori sheets.

and cooked rice. I have cooked some black rice with white to get a purple. Who knew? The rice seasonings include, soy sauce, vinegar and sugar.

add the soy sauce, vinegar and sugar in with warm cooked rice

and mix

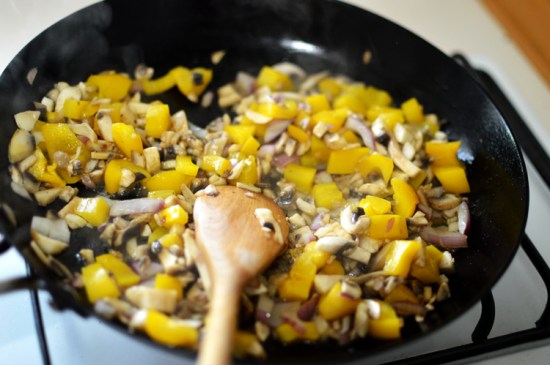
Add semolina and spices to the shrimp and mix well.

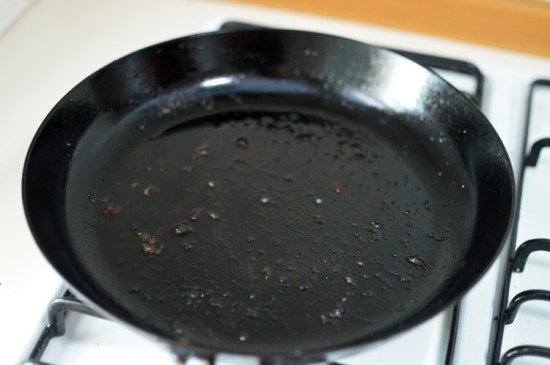
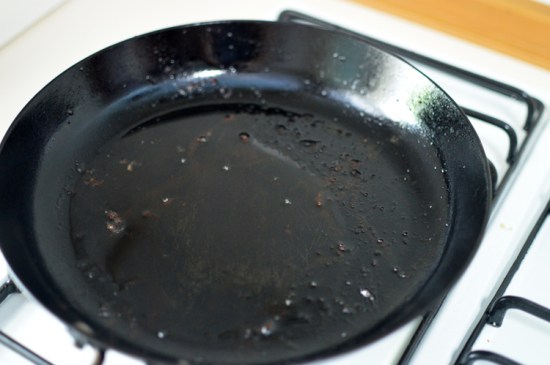
Cook on a hot skillet

until cooked and crispy. These shrimps have such an astounding flavour.

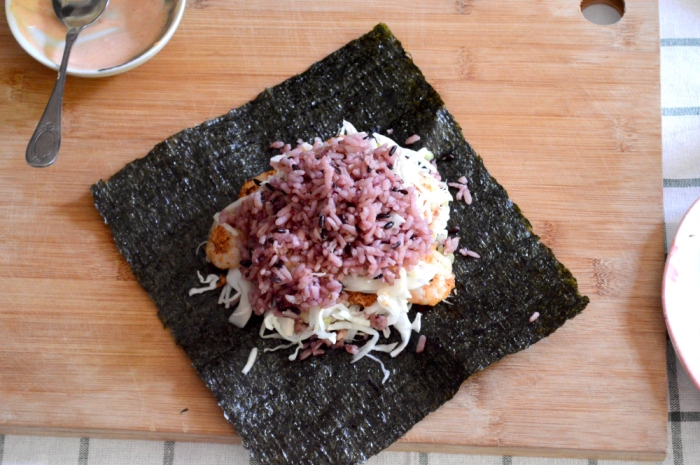
Now for the assembly which might look a bit intimidating but isn’t all that impossible. On the rough side of the nori sheet spread a layer of seasoned rice. Clamp it down well so it doesn’t dome and make this into anymore of a daunting task than it already is

Add a spread or sauce of choice. I went for the classic which is mayonnaise and ketchup mixed to primrose emulsion.

Top with cabbage or lettuce.

Followed by crispy shrimps.

Topped with some more cabbage

sauce

and rice. It starts with rice, it ends with rice.

And now it’s just a matter of folding everything into a pocket to form our onigirazu

Fold the opposite edges inwards so that they meet together and they’ll stick. Oh, they will stick. It’s magic.

Fold from the top and that there is our rather untidy pocket, but it’s there.

Now wrap it all in plastic wrap or butter paper as I used here because ugh, plastic! And that’s one done until we slice.

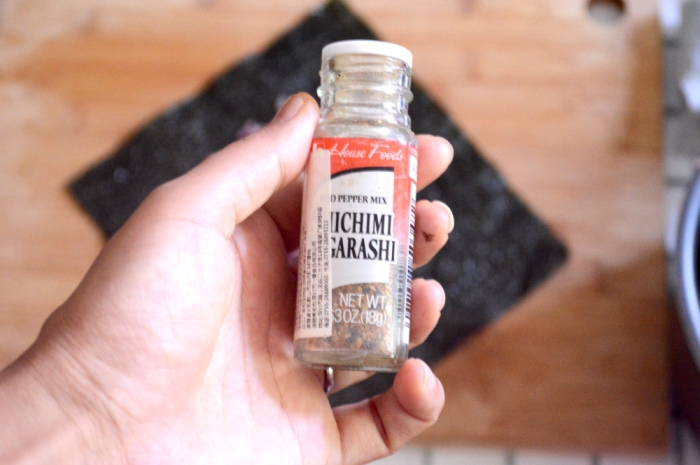
Same again for Onigirazu number 2. Start with rice and since the vegetables had no seasoning I went ahead with some shichimi, but you can use anything instead.

sliced carrots

Followed by coriander

avocado and more shichimi, which was then topped again with rice and folded.

and so here we have a cross section of both. Side by side. I topped the vegan onigirazu with a bit of sriracha

Ingredients

Cooked rice- 1 cup
Nori sheets: 2
Seasoning for rice
Soy sauce- 1tbsp
Vinegar- 1tsp
Sugar- 1 tsp

Vegetables
Carrots thinly sliced
Coriander
Cabbage thinly sliced
Avocado

Note: You can use any vegetables as per availability and preference.

Shichimi pepper for seasoning (optional)

For shrimp Onigirazu
Shrimp- 200g
Semolina- 1tbsp
paprika, pepper, oregano, cumin, minced garlic, salt -1/2 tsp each

Recipe instructions

Mix the soy sauce, vinegar and sugar with warm rice and keep aside.
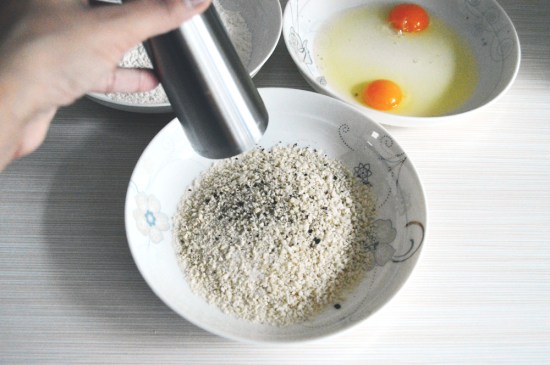
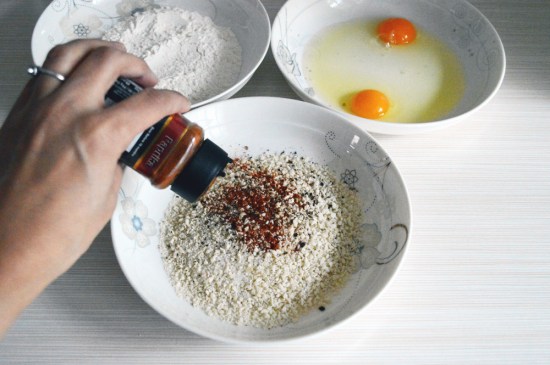
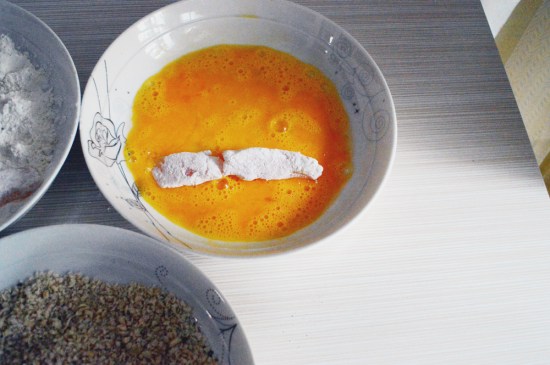
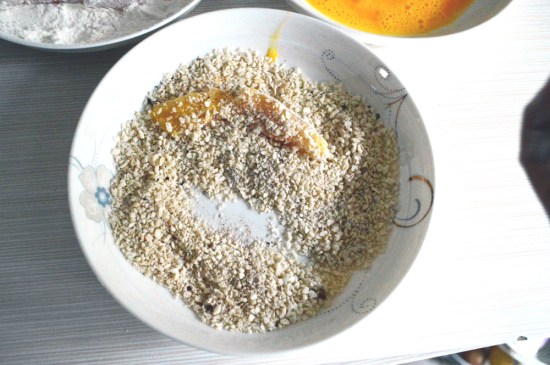
Mix the spices, salt and semolina in with the shrimp until they're well coated.
On a hot skillet with a teaspoon of oil cook the shrimp on both sides until crispy.

Lay the nori sheet so that the rough side is facing you.
Top with a dollop of seasoned rice and flatten it.
Followed with shredded cabbage. Spread some sauce or spread of choice on and top with shrimp. keep them all in a single layer so that the filling doesn't dome.
Top again with shredded cabbage followed by sauce and finally another dollop of rice.
Keep clamping down the filling.
Fold the nori sheet from opposite sides so that all meet in the middle.
Form into a pocket and wrap in cling film or butter paper.

Repeat process with vegetable filling.

Note: You can use any vegetables and seasonings according to your preference.

Enjoy!

Fish finger sandwich


DSC_0338
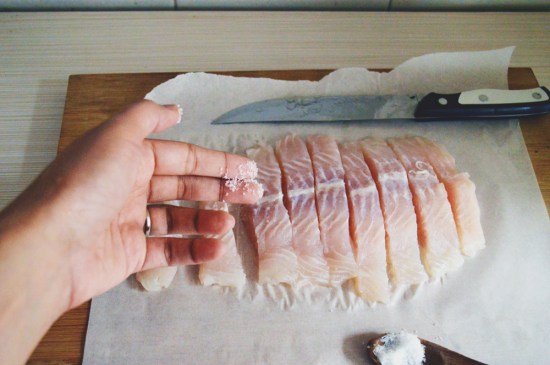
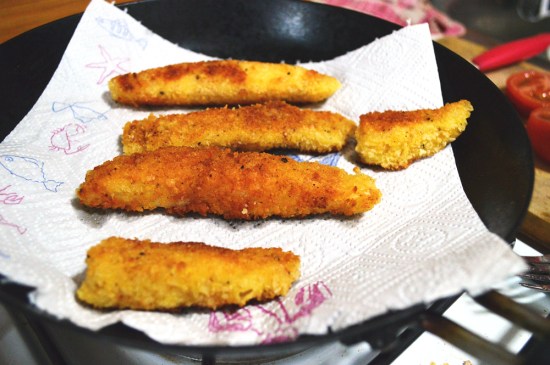
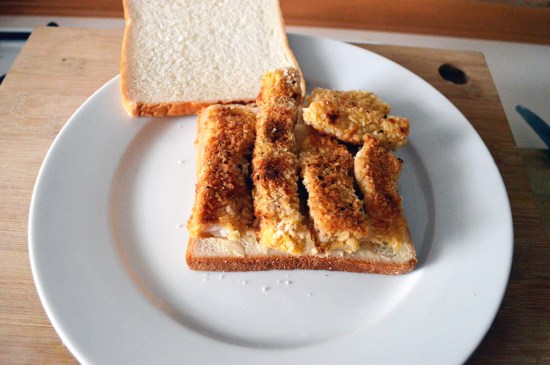
A little backstory on fish fingers from my nostalgic archives. The first time I ever had these was when I was little, nay, wee, hardly a sapling of sorts and my dad had ordered a plate of fish fingers and it was the first time ever I’d set my eyes on something that literally looked like fingers, smelled like fried food and came crumbed in crunchy bits of golden deliciousness.

I had only to bite into them to begin a life long, albeit clandestine love affair with all things crunchy, fried and finger like.

I’d no idea something coming from the aquarium could ever taste so wonderful, and of course as I grew up I since learnt that fish from aquariums aren’t meant to be eaten (usually) and that ones that grow up in rivers and seas are far better, and I’ve since then had a good share of fish fingers tucked in my belly (they sometimes show on weekends) and also gained more insight that as wonderful as they are on their own, they taste even better sandwiched between slices of delicious bread. It could be a carb thing, but fish finger sandwich is a more complete meal, whereas fish fingers are, umm, finger food.

So, for days that need to be substantially filled with something comforting, something extravagant and something out of the ordinary, fish finger sandwich is the answer.


DSC_0292

You need a boneless fillet of any sturdy fish. This is a commonly found basa fillet


DSC_0294

that I’ve cut into finger wide pieces and lightly salted on both sides. This not only flavours the fish from inside, since there will be many coatings on it, but also helps tighten the raw fish a bit, so it can stand the shallow frying without breaking apart.


DSC_0301

Now it’s just a question of assembly. Something of a conveyor belt procedure. I have here a plate of flour, eggs and breadcrumbs


DSC_0302

and this is also the part where you can season this dish. I like to season bread crumbs, because that’s the first element to come in contact with your mouth once you bite into these fish fingers. So a cracking rain of fresh pepper.

DSC_0303

imbued with the redness of smoked paprika. It’s these colour from paprika that’ll come through in tones of red orange once the fish fingers are fried.

DSC_0304

so the eggs are beaten, the crumbs are seasoned.


DSC_0305

and thus begins the first layering, wherein salted fingers of sliced fish are first placed in flour


DSC_0307

to be coated generously on both sides, Be sure to shake off the excess flour


DSC_0312

and dip in beaten eggs for the second coating


DSC_0313

followed by a burial in gravel like seasoned breadcrumbs for the third and final coat.


DSC_0316

This is what all my fish fingers looked like, I let them sit before frying so the final stage could be executed with all the efficiency of a kitchen virtuoso, who could hardly wait to get her hands on these sumptuous  lovelies.


DSC_0318

One could deep fry them, but shallow frying is just so much easier, not to mention safer. Fry in a couple tablespoons of oil on a medium high flame.

DSC_0321


I used a fork to turn them on all sides to get an even tan, and added more oil when needed. Never said it was a low calorie recipe.


DSC_0325

This was the first fried batch, and I let excess oil drain out on a paper towel. Somewhere around this time I also realized that one single fish fillet ended up making a good many fish fingers and that meant leftovers! Praise be lord.


DSC_0327

whip out your favourite bread. I used a whole wheat mini baguette for no reason other than I had this on hand. Spread copious amounts of butter. yes, butter is important.

Now if only someone had at this moment told me that my plate of choice is totally the colour of fish fingers and that it’s going to camouflage the entire sandwich in pictures, I’d have kissed that person on the mouth I tell ya..alas, no help was forthcoming since I was alone and my cat wouldn’t warn of incoming death let alone suitable plates.


DSC_0331

spread generously some mayonnaise, a layer of greens (spinach in my case) and tomatoes. In short get all the fixings you’d like in a sandwich. You could be as elaborate or minimal as you like. This is YOUR sandwich.

DSC_0337

layer on them fried fish fingers and voila! You have the most fabulous fish sandwich ever. It’s absolutely out of the world. Crunchy, filling with the distinct flavours of a well cooked fish encased in crispy crumbs entombed in buttery bread with all the fixings. This makes for such a lovely meal that you’d be left reminiscing this moment during your darkest hours. I speak from experience.

But wait! this isn’t the end. What do you do with the remaining fish fingers.

WEll, you can have them as is, or make another breakfast sandwich the next day.


DSC_0346

which is precisely what I did. A no frill white bread sandwich, with a layer of butter, a slice of cheese and remaining fish fingers.

DSC_0369

breakfast of ever fattening gods.

____________________________________________________________________________________________

Ingredients

Standard boneless fish fillet  : 1

Salt: 1/2 tsp (or more to taste)

Pepper: 1/2 tsp

Paprika: 1 tsp

Flour: 1 cup (120gms)

Eggs : 2

Breadcrumbs: 100gms (1 cup)

Oil for frying: 3-4 tbsps

For sandwich

Slices of bread or a baguette

Spinach or lettuce leaves: 3-4

Tomato: one small

Butter: 1/2 tbsp

Mayonnaise: 2 tsp

(you can customize this sandwich to your liking. Add mustard or cheese slices or pickles)


Recipe instructions

Cut finger wide pieces of fish and lightly salt on both sides. Keep aside.

Arrange three separate dishes for flour, eggs and breadcrumbs. Season the bread crumbs with paprika and pepper and beat the eggs well.

Coat each fish slice with flour. Shake off excess flour and dip into eggs until well coated and finally coat with seasoned bread crumbs till all fish fingers are well crumbed

Shallow fry on medium high heat in enough oil to make it golden and crunchy. Don’t add too many fish fingers in one pan. Add more oil as needed.

Once evenly fried and golden on all sides take them out and let drain on a paper towel.

Smother bread slices with butter and apply a layer of mayonnaise for sandwich. Add a layer of crunchy spinach and juicy tomatoes and top with as many fish fingers as your sandwich can accommodate.

Fish finger sandwich is now ready.

Enjoy!


Awesome breakfast sandwich


DSC_0768
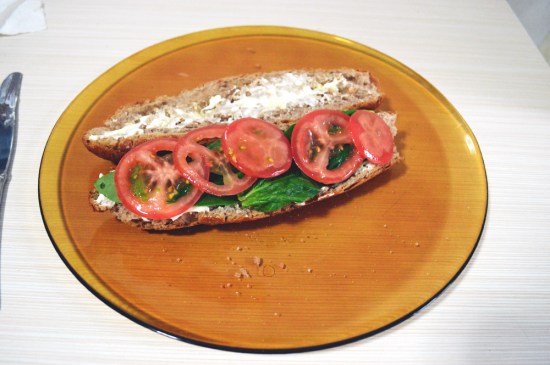
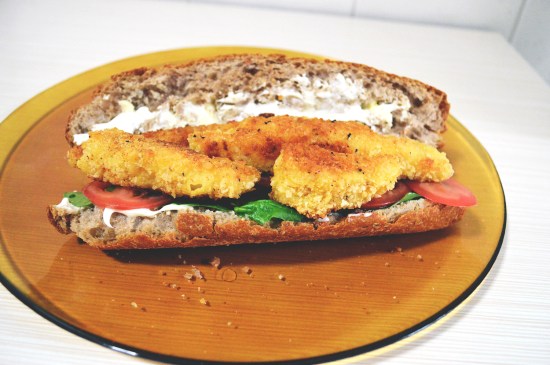
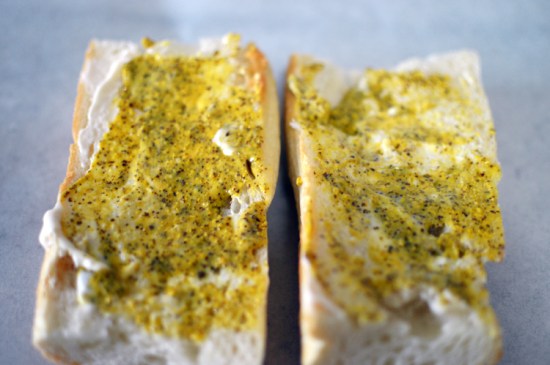
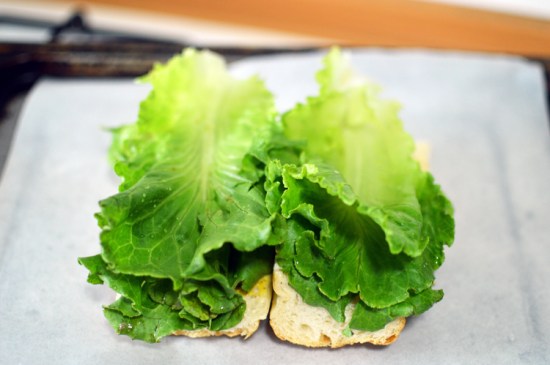
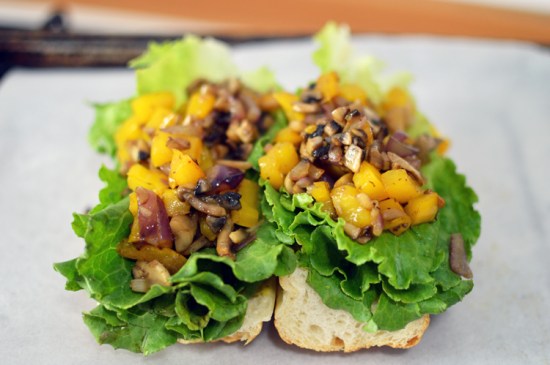
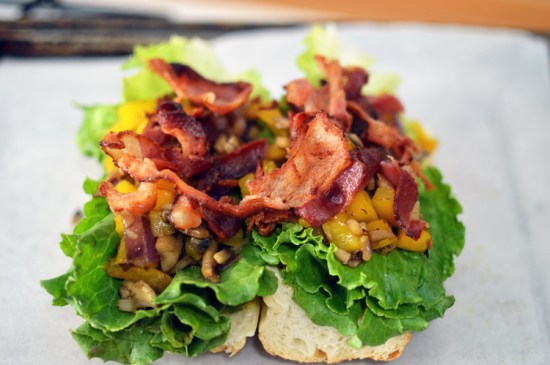
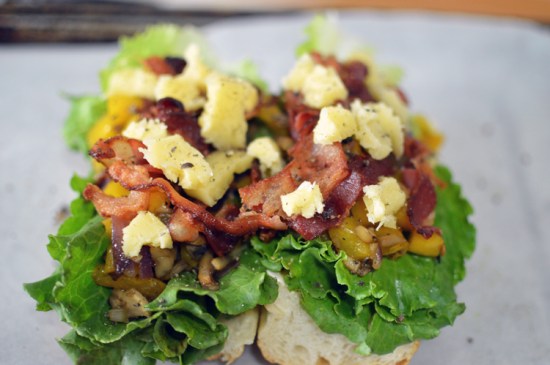
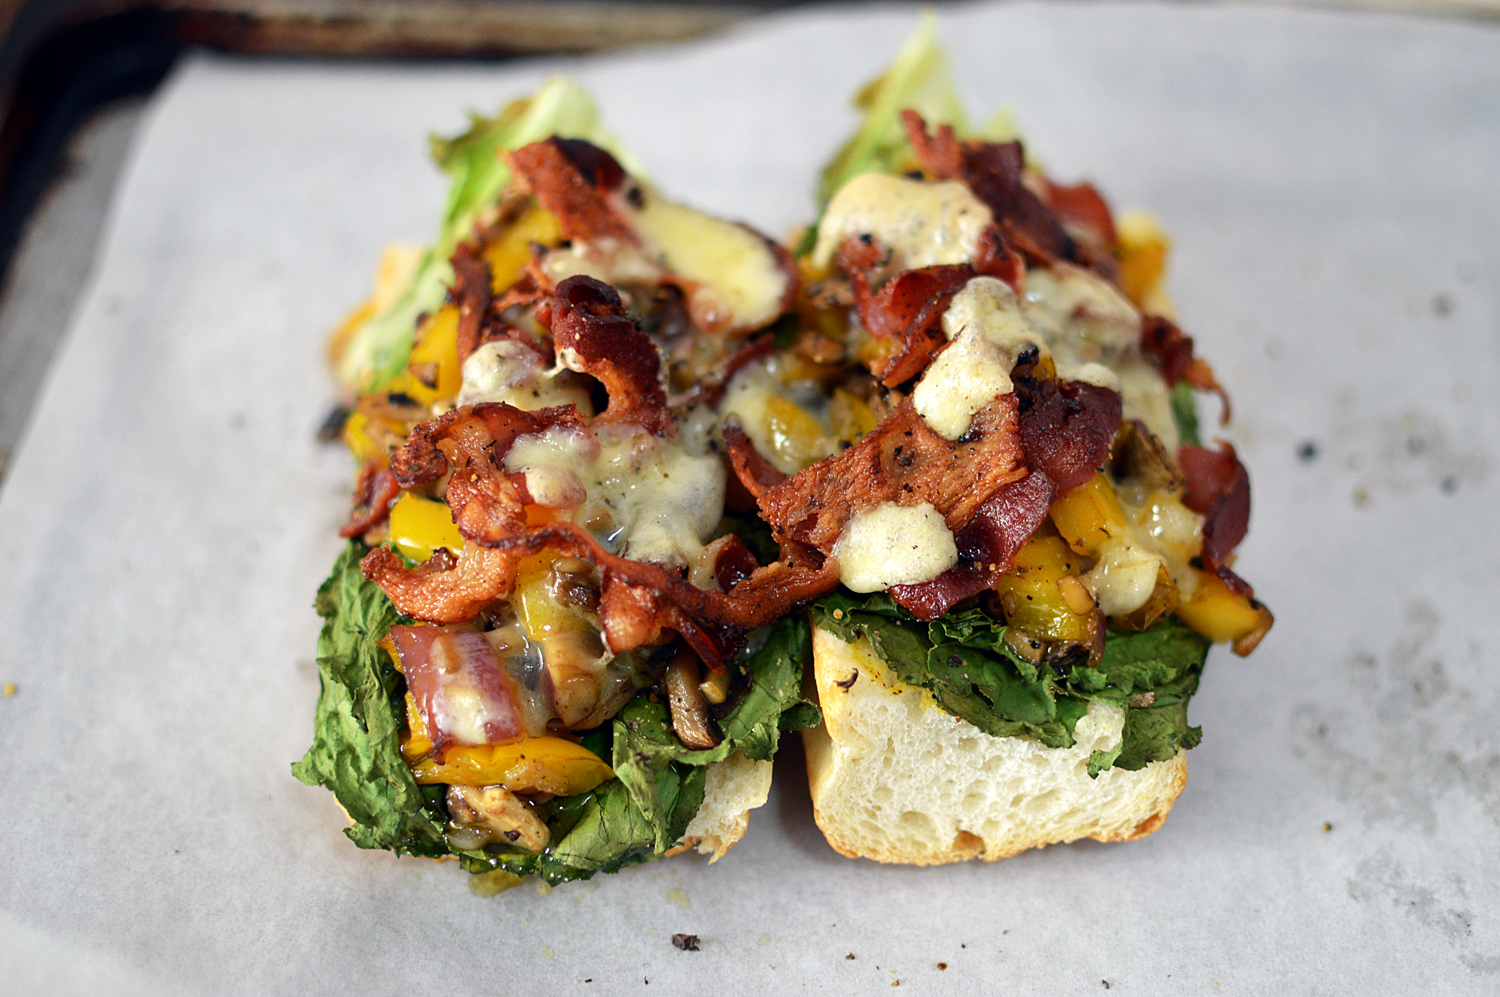
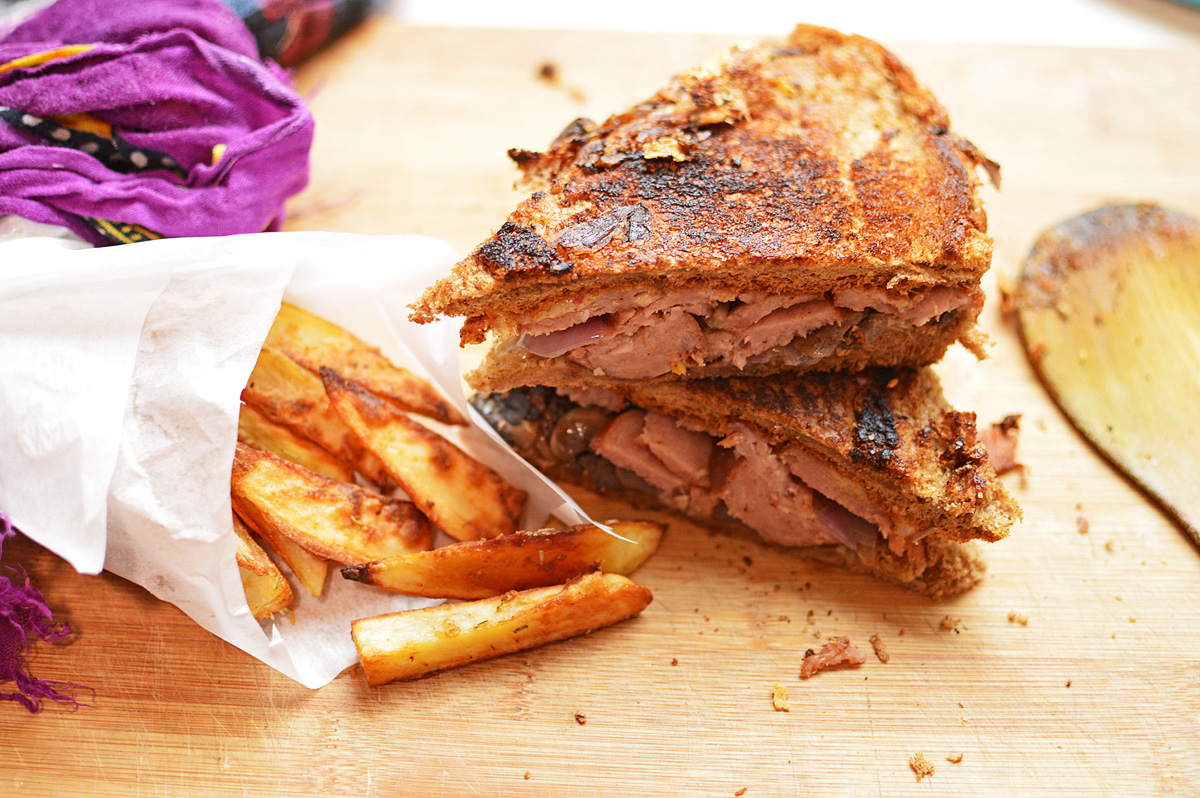
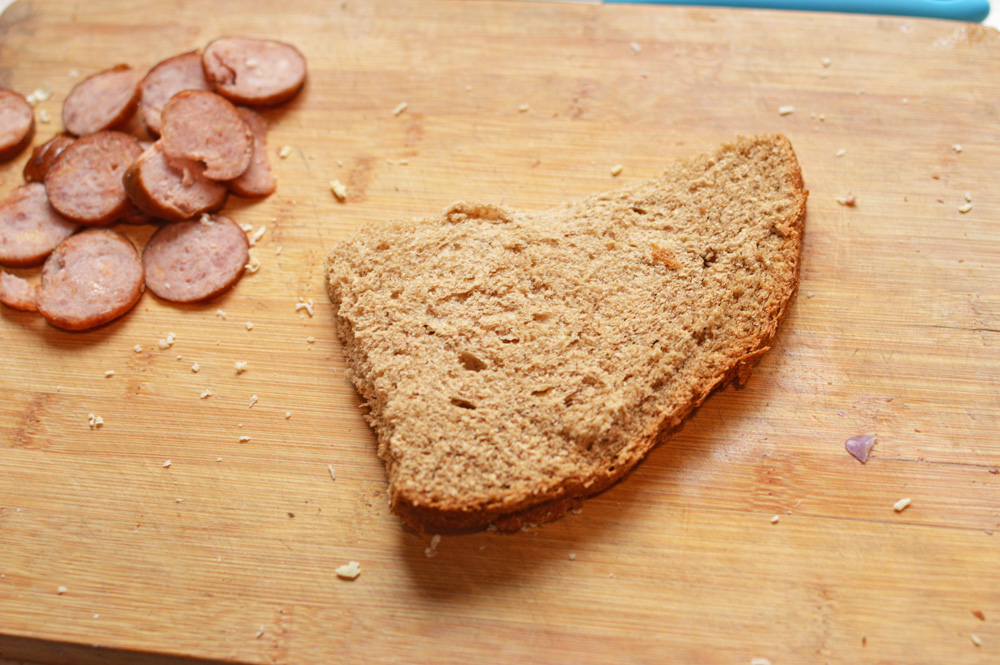
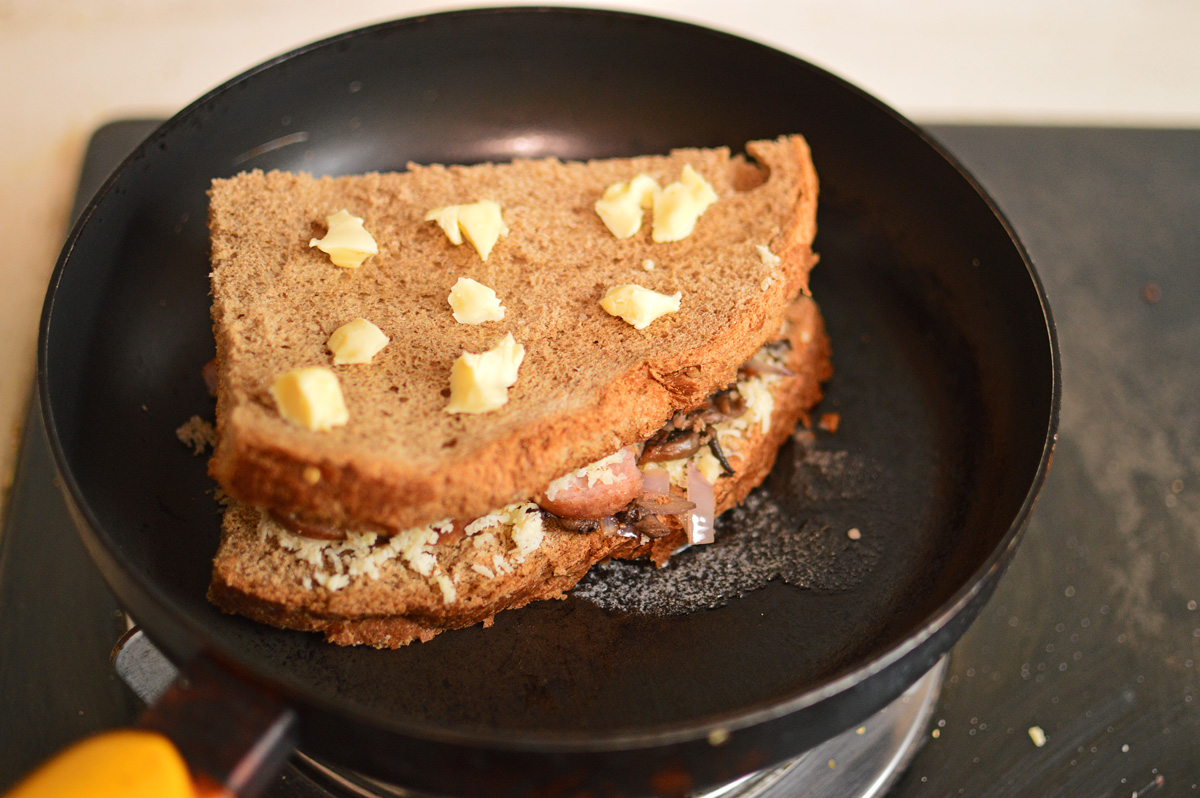
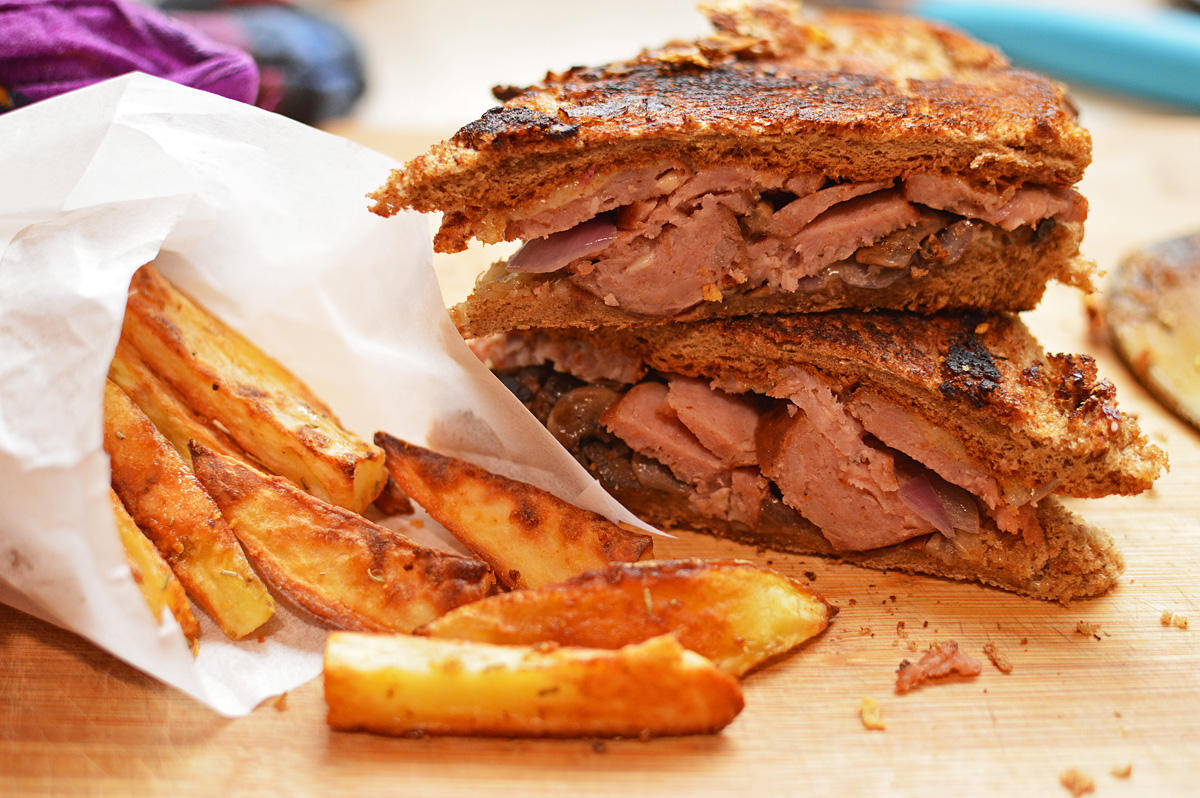
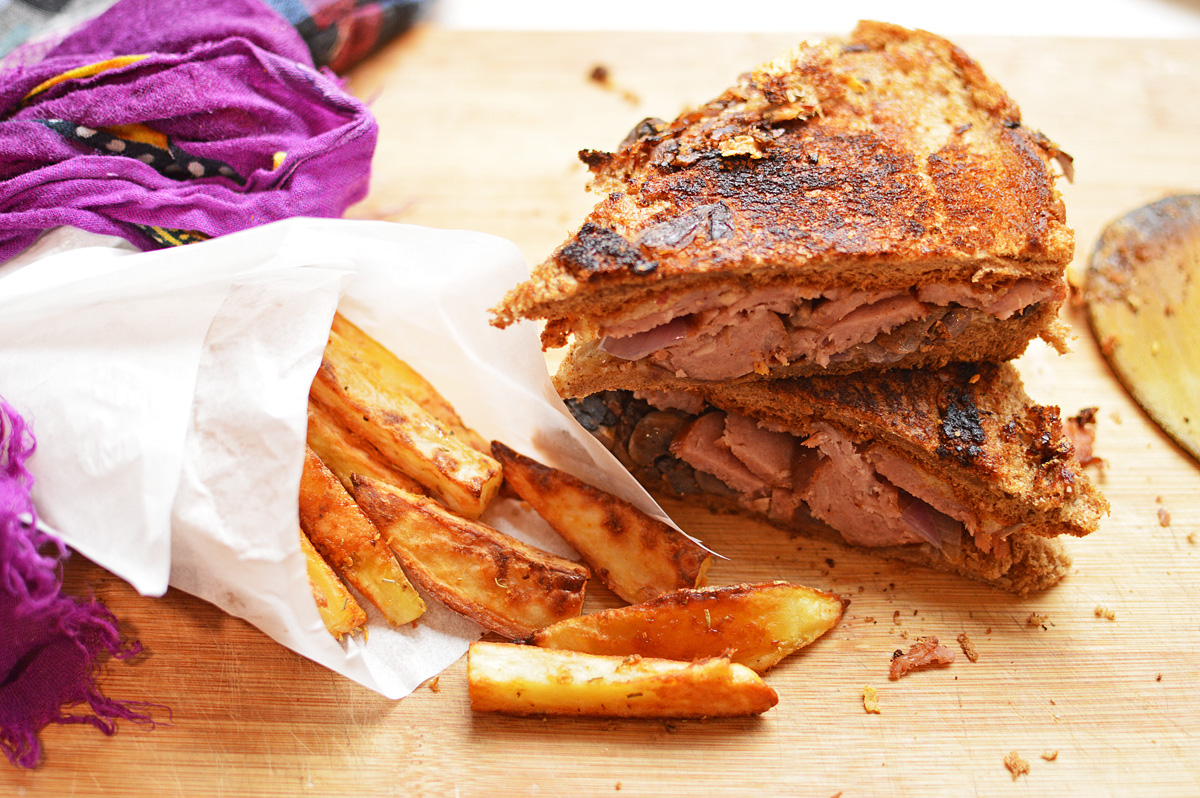
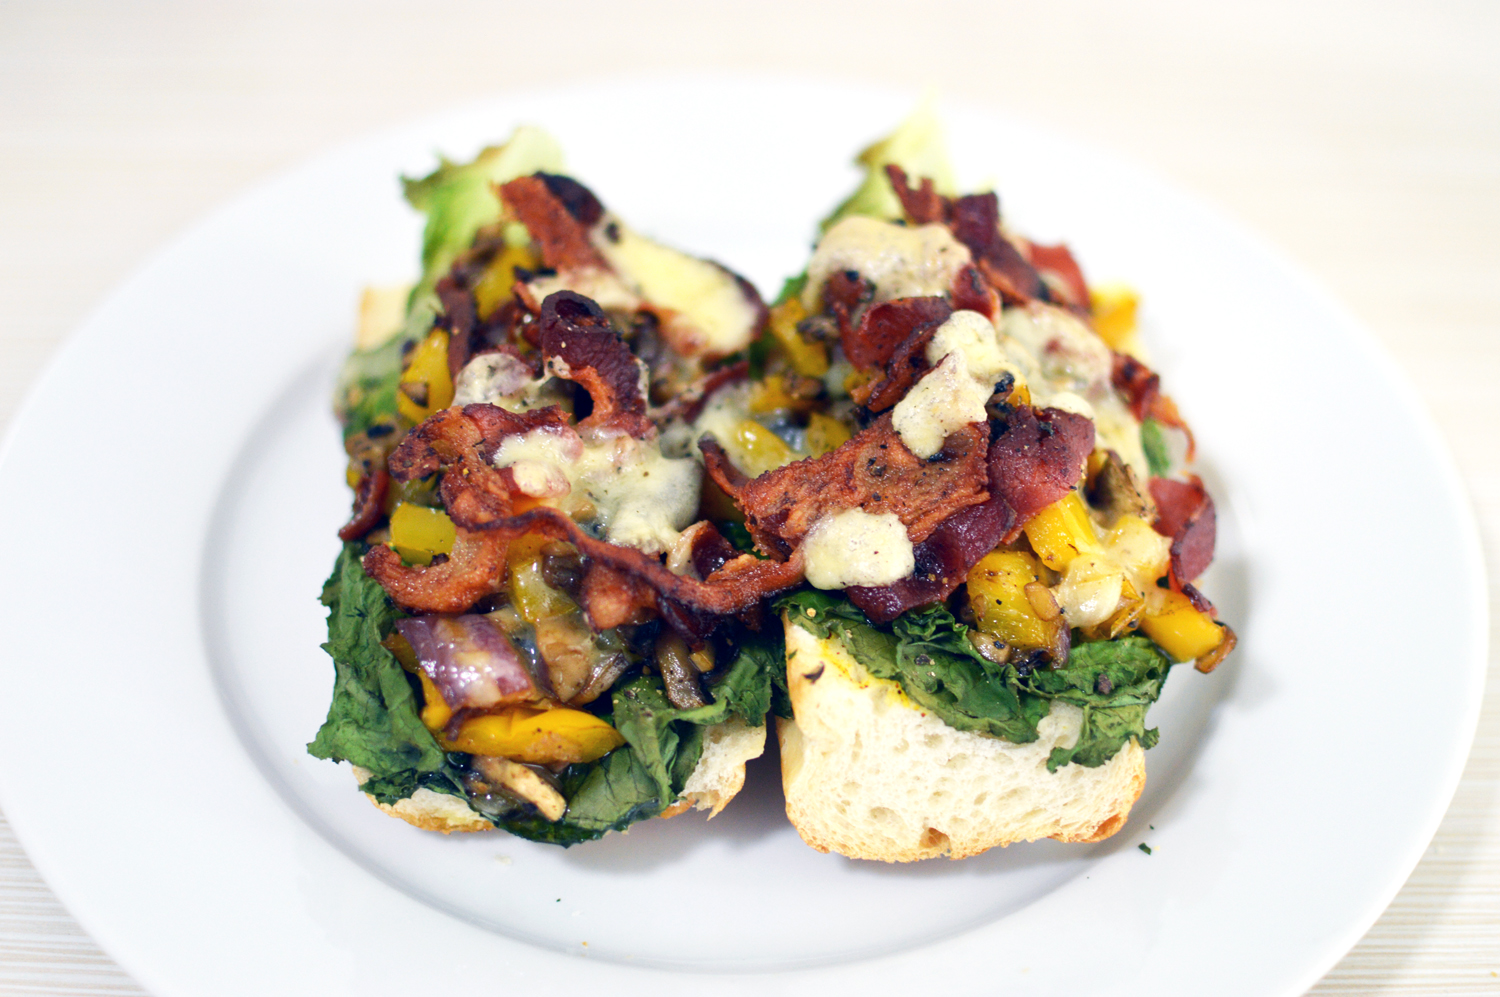
There’s no reason to call this an ‘awesome breakfast sandwich’ when this can be as easily called an ‘awesome brunch sandwich’, and does in fact serve as a fantastic brunch idea. It’s fast, filling and satisfying. Monstrously heaped with all things good, it’s indulgent, comforting and a fantastic fuel for moments when your body craves a morning laden with carbs and greasy crisp bacon.

No excuse ever needed for gorging thyself with bread, or sandwich, and this gorgeous tower of kindly extravagance can help sort of fill the voids in your sad mundane life, or pep up an already exciting one. It’s very versatile this sandwich; it doesn’t discriminate.


DSC_0730 copy
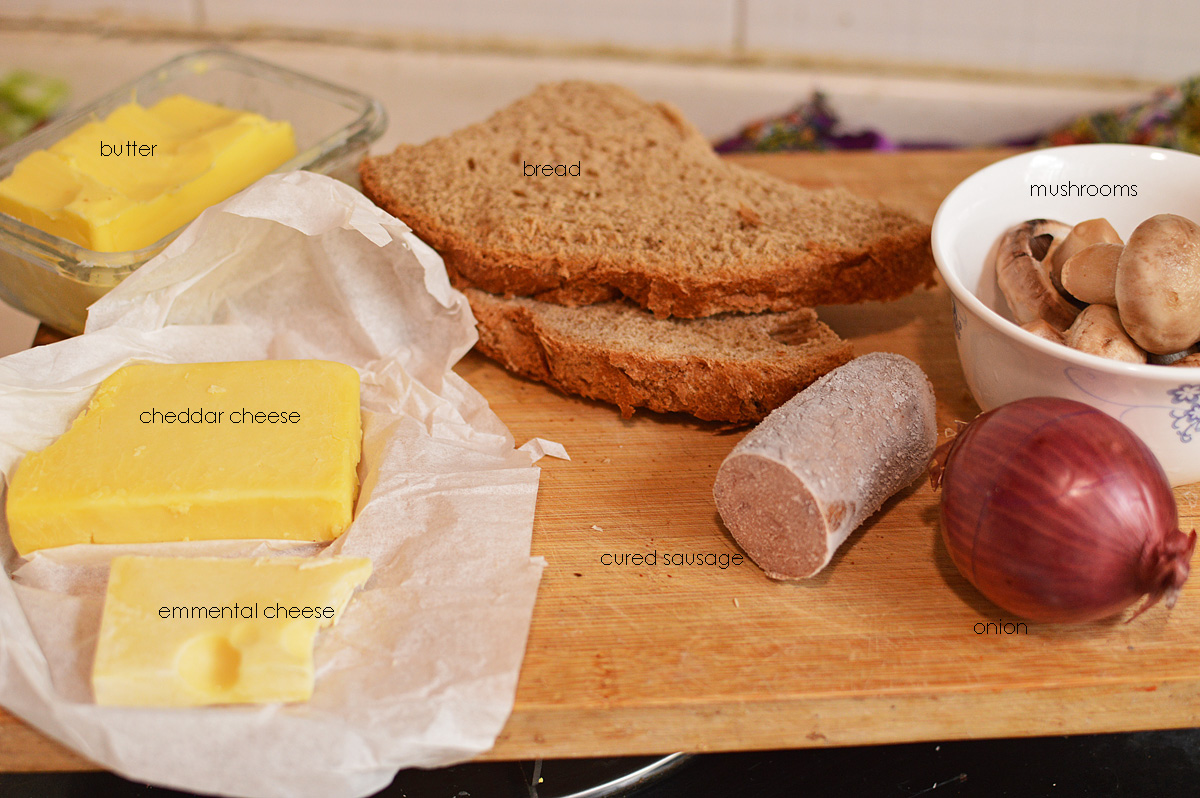
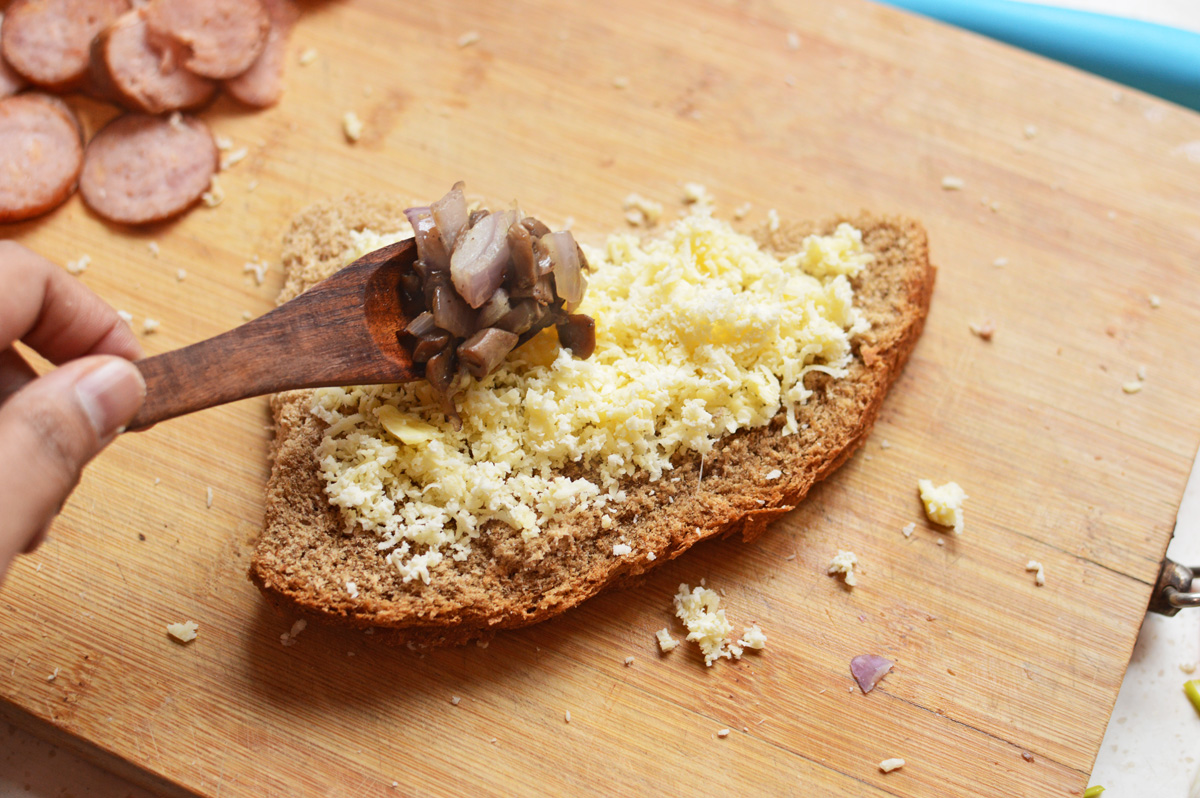
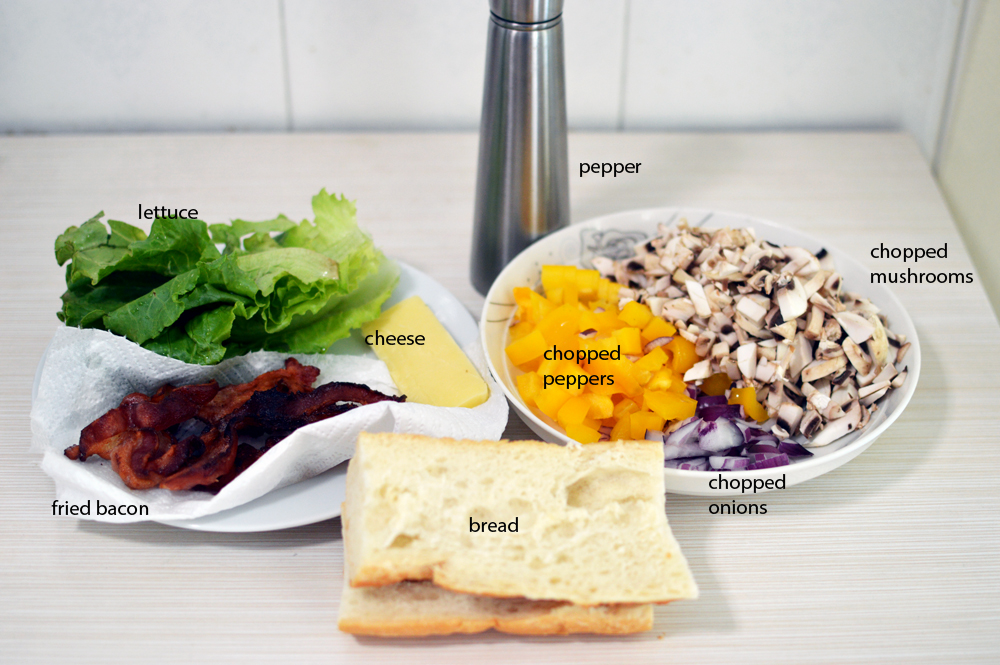
if you were to edit bacon out of this picture, you’d have the ingredients for a a very veggie sandwich. There’s also mustard and mayonnaise but they’re working behind the scenes.


DSC_0734


I used the same skillet that had the bacon cooking, and wiped out most its grease.


DSC_0735

added an additional tablespoon of regular vegetable oil


DSC_0737

and tipped in my colorful medley of vegetables.


DSC_0738

a bit of salt to get them going


DSC_0740

sweat them on medium heat, cook for about ten minutes, until there’s a visibly pleasant shrinkage of the caramelized and cooked kinds.


DSC_0743

like so. The vegetables will be a bit watery at first, but as you keep cooking them low and slow, they will soften and become more flavourful.


DSC_0741

Take this slow vegetable cooking time to lather bread with mayonnaise and mustard


DSC_0744

and spread it about


DSC_0746

now for the lovely assembly. I have lined a baking sheet with parchment paper, because these sandwiches will get a short burst of heat in the oven and also because there is scant cleanup in case of any drips and melts. So, top the now lathered bread with lettuce leaves


DSC_0749

with the green leafage as a receptacle for our sandwich fillings, pile high the cooked vegetables.


DSC_0750

followed by crispy bacon. As many pieces as your conscience would allow. I do not have a conscience at the moment.


DSC_0756

you can grate some cheese, or tear and Jackson Pollock them about. This is sharp cheddar and I didn’t even do a good avant garde bit..let’s call it modern art , and top off with a smattering of pepper.


DSC_0757

blitz in the hot oven at 200°c for 10 minutes, and Voila! indecently luxurious and voluptuous with a big V sandwich. Life’s answer to an overwhelming need to feed your greed.


Ingredients

sliced bread or bread loaves

Bacon crisped: 4-5 rashers

Lettuce leaves : 4

mushrooms: 5-6 chopped

bell pepper:1/2 chopped

onion: 1 small chopped

salt: 1/2 tsp

mayonnaise: 1 tablespoon

mustard: 1 tsp

cheese: 3 tbsp

pepper: 1/2 tsp

____________________________________________

Recipe:

Cook the chopped vegetables over medium heat. Add salt and saute for ten minutes until caramelized and well cooked.

Spread mayonnaise and mustard over bread and top with lettuce, cooked vegetables, crisped bacon and cheese.

Bake in oven at 200°c for 10 minutes, until the cheese had melted, the lettuce has slightly wilted and the bottom of the bread has crisped.

Enjoy!


Tuna melts


DSC_0979For days when you are absolutely miserable and voraciously hungry, tuna melts is the answer! This happened to be a particularly divine answer this Sunday, as I was completely out of meal ideas and was dying to eat something decadent and indulgent. It’s quick, not fiddley and the portions are considerably large, which means you can eat the leftovers for dinner and not even complain.

This version is slightly different from most since I didn’t want to include mayonnaise. What can I say? I wasn’t in a very mayonnaise frame of mind. Also because I had bought a different can of tuna that happened to be chili tuna, and I was dying to try it out, but more of that later.

for now..

DSC_093m0not very basic tuna melts fare, but I wanted to mix up things a bit. so cream cheese, garlic powder, cheddar cheese, boiled egg, onion, coriander, tuna and french bread.

DSC_0933begin by chopping the onions and coriander as fine as you can. I know coriander isn’t a very common ingredient in tuna melts, but these are not common tuna melts/ Just believe me ok?

DSC_0934fling into a large bowl. I have a thing for using small-sized bowls and regretting later, but not this time!

DSC_0935this is the tuna in question. This is new for me, if you’re used to this stuff then good. I figured it has chilli, but what I didn’t know was…

DSC_0936that it really had chili. They were not joking about their chili. Can you see these two red chillies. My soul jumped out for a second, but I regained my composure. I will eat tun melts, even if it kills me.

DSC_0938in with the devil red tuna.

DSC_0940chop the boiled eggs as well as you can. I was still reeling from the chillies I saw in the tuna can.

DSC_0941ah! these gorgeous colours. I knew it instantly this would be something of an ecstatic albeit searingly hot sandwich.

DSC_0942a pinch of pepper, because I had decided this to have pepper, so here it is.

DSC_0943garlic powder. yes you need it. Don’t sneer

DSC_0944in with the cream cheese. Trust me!

DSC_0945and some grated cheddar. I know by now you’re doubting my pure intentions, but please don’t. You’ll see in a minute. Mix well.

DSC_0948Time to build up. Lay you bread lovingly in front of you.

DSC_0950anoint it rather generously with the tuna mixture, or rather slather it barbarously.

DSC_0952as if it wasn’t enough already. sprinkle on some more cheddar

DSC_0954put on a tray to bake. as you can see I have two and there was no leftover tuna mixture. I used up by generously heaping them on the bread. and why not? bake at 190℃ for 15 minutes, or until the top melts and starts almost bubbling and the bottoms turns slightly crusty.

DSC_0955feast yer eyes. Look at these babies. I had no words nor expressions. I was spellbound. This is what gluttonous heaven for chili lovers is made of. This is what starving dreams of degenerate souls look like.  This right here is the answer to every question you might have.

DSC_0966this is a slab of everything evil and look how it melts and oozes from the side. It tasted luscious and dreamily melty. It might have been all the cream cheese, but ooh, was it  immoral. It was spicy, yes it was! but addictively so.You want to eat this. Everyday!

Ingredients ( this isn’t something you can measure, it’s more of a go with the flow and really up to your liking, but I’ll give somewhat accurate amounts as I figured)

tuna can: 1

Bread: half loaf of french bread split into two (you can even use sandwich bread)

onion: medium-sized or half of a large one (chopped fine)

coriander: 2 tablespoon (chopped fine)

egg: 1 large hard-boiled (roughly chopped)

cream cheese: 180g ( a bit less than 1/2 cup)

cheddar cheese: 4-5 tablespoons + more for sprinkling on top (optional)

garlic powder: 1 teaspoon

pepper: 1/4 teaspoon

Preparation instructions:  Mix all ingredients in a large bowl and mix until well combined. Spread generously on bread. Top with some more cheese, and bake at 190℃ for 15 minutes until the cheese had melted and the bottom is slightly crusty.

Alternately you can also sandwich this filling to make a grilled cheese sandwich. It works beautifully both ways.

There really isn’t much to it, but the addition of coriander just ups the flavour ever so well and the cream cheese makes it wickedly melty.


DSC_0970Enjoy!!


Stoners grub: Sausage, mushroom & cheese sandwich


DSC_0935When thoughts are dull, days are cold and pleasures scarce, it’s always the food we turn to for comfort. There are days when even the idea of having something virtuous like smoothies, salads and fruits makes you want to launch a crusade against health food, you turn to sustenance. Hearty, innocent, full-bodied food that’d make you tuck in like a tapeworm, food that’d make you cry with joyous tears.

This sandwich is the stuff that voluptuous dreams are made of. It’s the kind of food you’d want to have after a night of crazy drinking or a joint too many. For days when you want to carelessly binge, for moments when you want to feel fueled and for times when you have the munchies for planet portions of feel good food, this sandwich is a life saver.. and it’s easy enough to throw in a matter of moments.

DSC_08922This is a pretty versatile affair. You can stuff it with whatever you want, but I did mine like so… butter, cheese (emmental & cheddar), cured sausage, onion, mushrooms & bread.

Now before I start this, I’d like to mention that  this is just my version. You can make this anyhow you want, using whatever cheese, whatever meat, whatever mushrooms, in fact whatever whatever. Just make sure its got plenty of meat and cheese and butter.

DSC_0893I started with the sausages and sliced them like so.

DSC_0894into a hot pan for a few seconds just to let them warm through. These are cured so they don’t really need any cooking. That makes this recipe so much easier.

DSC_0895Now very carefully because this step call for being an incompetent chopper, chop your mushrooms. Be very casual about it, because it’s not a gourmet sandwich meant for a Michelin table.

DSC_0897In a pan or skillet, heat a tablespoon of butter along with some oil.

DSC_0898add  in the mushrooms because we want to cook them and turn them brown and get rid of their water. We don’t want a soggy sammy!

DSC_0899while that’s cooking away, in a similar incompetent fashion chop the onion. Make sure there’s nothing pretty about it.

DSC_0900check your mushrooms. add some crushed black pepper (entirely optional) but oh so good!

DSC_0902

DSC_0907while the mushrooms are cooking up, grate your cheeses. In hindsight I realized I should have used a box grater because it took me forever to grate this but it doesn’t matter, the important thing is grated cheese.

DSC_0903checking the mushrooms they looked good and almost done.

DSC_0905add in the onion and just stir it in the mushrooms. We don’t really want to cook the onions just slightly soften them. This step is done.

DSC_0909This step is essentially building up your sandwich. I have here some hearty brown bread ( I don’t know why though), but use any bread you prefer.

DSC_0910Layer on the cheese

DSC_0911Pat it down so that it doesn’t bulge up and form a hump. then layer with your mushroom onion mixture.

DSC_0912like so.. and sort of flatten it a bit to prevent a dome formation.

DSC_0915layer your sausages and while layering I realized that the sausages were a lot more than the rest of the ingredients but you shouldn’t let trivial things like these matter, so build away. Finally top it with the remaining cheese.

DSC_0916Gently place the other half of your bread on top if this structure. Press down a bit, but honestly if you stuff your sandwich to this point some meat or cheese is bound to ooze out in the most gratifying way.

DSC_0917If you have softened room temperature butter then please violently slather it on your bread, I however had very cold butter which I simply dotted all over the top.

DSC_0919Melt a generous amount of butter in a pan

DSC_0920place your bread on it and move it around a bit to let it absorb all the butter. Once you feel it’s done from the bottom, carefully flip it and cook the top side. There might be some spillage in the process but i don’t think it matters.

DSC_0938There you have it, a meal fit for the gods of carnal pleasure. Get your munchies on, get rid of your hangover, binge eat and give up yourself to some sin. This is seriously good. Eat these with some delightful baked potato fries

Ingredients

  • cured sausage or meat of your choice diced into small pieces (crisped bacon, yesterdays chicken, can of tuna, anything you love) – 100-150g (mine was 1/2 cup)
  • sandwich bread slices
  • Emmental and cheddar cheese (or any cheese you love and have readily available) – 1/2 cup
  • mushrooms – 5-6 medium size
  • onion -1/2 of a big one or 1 small
  • butter – 4 tablespoons or more
  • salt & pepper to taste

Recipe: dice the sausages into pieces and let them warm through on a hot skillet. Keep aside.

Melt one tablespoon of butter with some oil and add in the chopped mushrooms till they are cooked and their water has evaporated. Add in the chopped onions and pepper and salt and cook for another minute. You don’t have to cook the onions completely.

For the assembly, start with layering the cheese, followed by the mushroom onion mixture and then the sausages. Press down a bit after every layer to prevent the formation of any bulges.

Heat some butter in a skillet and place your sandwich on it and move around to help it absorb all the butter. Also butter the top part of your sandwich and once the bottom is nicely browned flip it over carefully.

If there is any spillage, you can always push them back into your sandwich.

Make this!!!

DSC_0937Enjoy.