Chiffon cake


Image

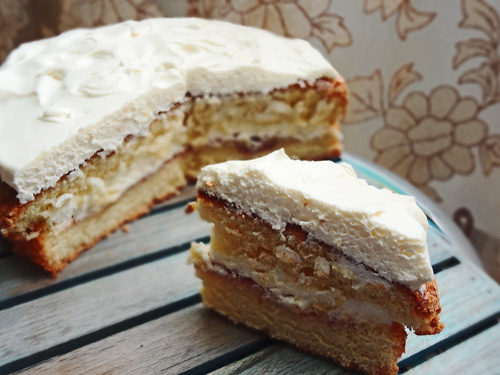
This is a cake I had made a few days back when I was asked to make a proper cake with a lot of icing. Yes, my husband is a sucker for filled or iced cakes.  Considering the layers of creamy icing I’d have to slather onto the cake, I decided to bake a cake which in itself isn’t heavy at all.

This chiffon cake I think is perfect for a thick icing, since it’s not heavy on its own whatsoever. Also spongy, airy and light, and in fact tastes like one of those store bought cakes which we usually get to eat at kids birthday parties. However this was all fresh, nothing store brought except the ingredients.

The other good thing about this cake is that it only needs a very few ingredients. One can make a fairly large cake out of it too and it’s perfect for gatherings.

I have no step by step pictures this time, but it’s so easy really.

Ingredients

5 large eggs- separated

170 gms sugar

2 tsp vanilla extract

90 gms flour.

For icing

Whipped cream

This is it. These are all the ingredients. No need for any baking powder, butter, nothing. It;s a very light cake.

Okay, first we have to divide the sugar into three parts.

Sift 50 gms sugar with the flour,and keep aside. 50 gms sugar for the egg yolks, and the rest 70 gms if for the egg whites, so keep aside.

Starting with the egg yolks first.

Beat the sugar and the egg yolks till they take on a pale yellow hue. I had to beat mine for about 15 minutes- I was using a hand mixer. You can by all means use whatever you feel necessary. Once you have reached that stage wherein the sugar and eggs are completely mixed and pale eggy yellow, mix in the vanilla and beat until its all incorporated. Into this mixture sieve in the flour and sugar and keep aside. Don’ mix anything right now.

Now we start beating the egg whites. Beat until they form soft white peaks. This is the time we start adding in the sugar, a teaspoon at a time. This is to ensure that the sugar is completely incorporated and that there aren’t any undissolved sugar crystal. The beating has to be vigorous. Beat until all the sugar has been mixed, the eggs are shining white in fact a bit matte by now, and forming stiff peaks when you lift your beater.

For the final folding of the batter. Take 1/3rd of the egg white mixture and gently fold in with the flour and egg yolk mixture. You have to ensure that you fold it well, instead of mixing like a maniac, because it’s the folding that ensures a very risen cake. When the batter gets well mixed, fold in the remaining egg whites.

The Chiffon cake batter will look very very pale yellow, in fact sort of creamy, like the wall pain on my kitchen.

I used a springform pan. It was easy to just take off the sides, but really, use whatever shaped mold you like.

Bake at 160℃ for 45-50 minutes. The cake will rise to extraordinary proportions. It was a joy to just watch it rise every minute.

Let the cake cool before you slather the icing. You can either bake the cake into 2 molds, or be lazy like me and bake into one and divide it into two by using a clumsy hand and a serrated knife.

Enjoy !!!

South Indian Sambhar


Image

Sambhar is a very popular South Indian vegetable stew/broth/curry.. whatever you might want to call it..  Subtly sour, full of vegetables, low calorie, and the greatest accompaniment to rice

This dish has so many different ways of making depending upon where it’s made. This recipe right here is how my mother makes it, without using those boxed sambhar masala’s. I don’t really like that flavour, and this is how I have eaten this dish forever. No, I’m not some sambhar purist and It’s entirely up to you to use a packaged masala.. But this is the way I roll, or rather my mom did, and trust me you have to taste this to know how fantabulous this actually is.

Image

Vegetables!! The main ingredient. I have used beans, green peppers, brinjals. You can easily use any vegetables you like, drumsticks, cauliflowers etc etc.. whatever you want- the onions and tomatoes are a must.

Image

these are 200 gms of pigeon peas (split toor dal). These form the base of our sambhar.

Image

Into a deep pot, put in all the ingredients. The chopped vegetables, the lentils and add the water. This will be 600mls of water.

Image

Now the spices. 1/2 tsp asafoetida powder. (hing)

Image

1 tsp turmeric powder. It does bring out the yellow, and oh boy, yellow it is.

Image

salt- a little short of 1 tbsp. It’s a lot of sambhar, and under salted food is vile.

Image

Mix them all together now and put it on a boil. We need the vegetables to be well cooked, in fact softened and almost not blended. Also the lentils do take some time to cook. I boiled them for about 40 minutes.

Image

Now for part 2. and this is what makes this dish truly South Indian. These spices, sort of form the soul of this food. I have here 4 cloves of garlic. 1 tbsp of coriander seeds, 2 tsps fenugreek seeds, 1/2 cup shredded coconut.- If miraculously you happen to have fresh coconut, then nothing like it.

Image

Into a very hot tablespoon of oil, add in the garlic cloves

Image

Going next are the coriander seeds and the fenugreek.

Image

in goes the shredded coconut

Image

keep frying them all together until the mixture turns brown, like so. Now this is when your house house will smart smelling like a spice incense. It’s heaven I tell you.

Image

Into a blender they go. Mix in about 1 tbsp of water so that everything comes together beautifully.

Image

This is what the blend looks like.

Image

Now if you wish to make your dish more spicy, add in some ground red chillies (completely optional). usually one adds dried red chillies before blending, but since my husband is not a friend of the spicy stuff, I like to do this to control the chilli.

Image

The final blend.

Image

The last in line of taste and aromatics. I have some curry leaves. It’s a handful really. But in case you have the fresh stuff 8-10 leaves will do. Also 1 tbsp of tamarind paste. This tamarind gives the sambhar its distinct subtly sour taste.

Image

The unveiling of the vegetables and lentils. I cooked them for about 40 minutes and this is how they turned out. The vegetables were soft and mushy in golden yellow curry and the salt was just fine.

Image

Remember the blend from the coconut etc. .. well, it’s time for it to meet its destiny. In it goes in the lentil and vegetables mixture.

Image

the curry leaves go in.

Image

Finally the last ingredient- the sour tamarind paste. This all needs to cook again for another 10 minutes, before you serve it piping hot with rice.

Image

Here we go- the moment of TRIUMPH. Doesn’t this look gorgeous? It tastes even better. The best part about this recipe is that it’s not heavy, its not very oily and it can be eaten just like that- as a sort of soup. I love it, and so will you..Enjoy !!!!!

Ingredients

200 gms of pigeon peas (split toor dal)

chopped vegetables of your choice.

1 thinly chopped medium sized onion

1 thinly chopped medium sized tomato.

600 mls water

1/2 tsp asofoetida (hing)

1 tsp turmeric powder

1 tbsp salt

1 tbsp coriander seeds

4-5 cloves of garlic

2 tsps fenugreek seeds

1/2 tsp crushed red chillies (optional)

1/2 cup shredded coconut

1 tbsp oil.

8-10 curry leaves

1 tbsp tamarind paste.

In a deep pan mix the chopped vegetables, onion, tomato, water, asofoetida, salt and turmeric. Cook them on medium flame for about 35-40 minutes (covered) or until the lentils are cooked and the vegetables mushy.

In a separate pan, heat the oil, tip in the garlic, fenugreek and coriander seeds, coconut. Fry until it’s all golden brown. Once these spices are golden and fragrant, blend them with a tbsp of water. Add crushed chillies as per taste- they’re completely optional.

Into the pot of cooked lentils and vegetables, add the blend of spices, the curry leaves and the tamarind paste.

Cook for another 10 minutes.

Serve warm.


Coffee chocolate cupcake


Image

Dark, crumbly and sinful. These cupcakes, which can be easily turned into a cake if you increase the recipe are one of my favourites. Not too sweet, gorgeously dark with a strong hint of coffee. The best way to curl up and read a book while scarfing down an entire batch.

The thing is that I usually make cupcakes, since I’m only baking for 2 people, and I hate the sight of cakes or food just transferring from table to fridge. This is a recipe for a cake, which  I adapted to make into cupcakes. I made 8 of these, and you can easily decrease or increase the ingredients to suit your needs.

This is what the innards of this astounding cupcake look like. No comments on the size of the bite though.. see- moist and crumbly and oh my god WOW !!

Ingredients

110 gms flour

4 tbsp sugar

1 egg

1 tsp baking powder

2 tbsp buttermilk

150 mls hot coffee ( I used instant coffee)

1 tsp vanilla

2 tbsp cocoa powder

4 tbsp veg oil.

For this recipe, you need a bowl an a whisk. if you so wish you can use a mixer, but really this is all you need.

Sift in all the dry ingredients together. Gradually add in the egg, vanilla, oil and yogurt and mix well. Now gently tip in the hot coffee, all the while mixing you batter. The resulting batter will be liquidy and this is actually what gives it the springiness.

Bake at 170℃ for about 20-25 mins.

These cupcakes are a wonder. So easy, so tasty and so very dark and moist.

Enjoy !!

Spicy green Coriander Chutney


This Technicolour green, diabolically spicy chutney is one of my mom’s recipe’s, and I have adopted this with absolutely no changes. If it ain’t broke, don’t fix it, and if it’s magnificent then just blindly follow it.

So this post, is in fact a tribute to my mother’s food, and the colours she brings out in it and the fact that all I know is all from her.

To this day, this chutney hasn’t tasted as glorious as my mother’s,but still to the naked eye it’s pretty darn good.

Now before I start its recipe, I just need to tell you that this is great with anything. Eat it with mashed potatoes, grilled chicken, omelette, parantha, as a salad dressing (make it mild in which case), as a dip for chips, fritters etc etc.. but my absolute favourite way to eating this is, slathered over a buttered toast. Oh how it brings out the flavours..

Anyways.. I haven’t any step by step pictures because I forgot.. but anyway…

Ingredients

coriander a whole bunch- washed and De stalked with just the leaves. (hard to tell the weight cuz its just leaves and really how many were they. I think mine was around 1/2 cup about 20 gms. a bunch is a better specification)

3 fat cloves of garlic

2 tsps cumin seeds

2 green chillies- the smaller more evil ones.

2 dried red chillies (also incidentally the name of my blog)

1 tsp salt (to your taste actually- but not under salted please)

1.5 tsp dried mango powder

1 tbsp water

Yes, you’re wondering why so many chillies..it’s spicy coriander chutney isn’t it?  but seriously if you’re a bit worried about so much evil deliciousness, by all means reduce the chillies.

The rest is easy.. just put all the ingredients in your mixer jar and whizz for a couple of minutes on high till all’s combined and green. Make sure the garlic cloves are all minced in and not a speck of anything identifiable remains.

That’s all folks.. this can be refrigerated for a few days and tastes best when fresh out of a jar, though once you’ve tasted it it;s hard to stop eating.  Eat it with whatever you wish, but seriously try it on a butter toast.. magnifique..


Double chocolate chip cookies


It’s been really long since I put any new posts, and this is how I really wanted to make up. I had been traveling, working and being lazy and yes was away due to work related issues and was working my ass off, in fact the few months of crazy work and long hours of commute had almost turned me into a comatose vegetative state.. Not anymore though: For I bring forth to you.. a double dose of chocolate in these little cookies.. om nom nom nom

Very easy, nothing much in the way of too much work. Grab your mixer, either hand or stand.. assemble ingredients and its just a matter of putting in everything one after another.

Btw, not step by step pictures this time…It’s been almost impossible blogging from China and putting in more than one picture is just not happening.. Soooo  SORRY>. will try something else next time 😦

Recipe Ingredients

110 gms butter

75 gms granulated white sugar

70 gms firmly packed brown sugar

150 gms flour

1 large egg

1 tsp vanilla extract

150 gms chocolate chips

1 tbsp cocoa powder

First things first: In a separate bowl mix the cocoa with the flour and set aside. In the bowl of your electric mixer beat butter and sugars until light and creamy and gorgeous. Beat in the egg and mix until well incorporated. Add in the vanilla extract and combine everything beating well. Now slowly add the dry ingredients without making a mess if possible (flour+cocoa). and beat it all together, slowly adding in the chocolate chips too..

Refrigerate the dough for a while- 20 minutes should do it.

Either use an ice cream scoop or use 2 spoons and drop the dough onto the baking sheet.Bake for around 12-14 minutes (depending on your oven) in your pre heated oven @ 180℃

Allow to cool on a wire rack and dig in.

This recipe made me around 2 dozen cookies.. it can vary according to the size you decide to make. All in all, these are easy, delicious and devoured immediately..

Scones- the tiny edition


I wanted to make super tiny scones so that I don’t tempt myself with the nice big ones and go crazy eating them throughout the day. I decided to indulge myself with these bite sized pieces- lessening the guilt and upping the cutesy factor.

These teeny tiny scones were the work of a moment without too much work, and absolutely gratifying.. I mean how could you not love them. I finished the entire batch in a couple of hours- Jam, butter, honey.. it work with everything.

Few ingredients & quick to make.

one cup of flour, 1 tsp salt, 1/2 tsp baking soda and a fat knob of vegetable fat/butter.. this here is 2 tbsp of fat in 1 cup flour

using a fork or a cookie cutter or simply the tips of your thumbs & finger mix the flour and the fat so that the mixture starts resembling wet clumped sand. A grainy mixture, making sure all the fat is incorporated well into the flour and distributed evenly.

the next step is pouring in the butter milk into the mixture and stirring the flour so that it just about starts to com together. Kneading is NOT REQUIRED. use your hand mixer or stand mixer or in my case just a spoon. I used in about 3 tbsp of buttermilk.

This is what my fat disc of mixture looked like. I wanted to flatten it because these are teeny scones, but if you’re looking for a regular size, just start cutting up this fat disc with your round cookie cutter..

I rolled the disc to about 1/4 of an inch thick and using a tiny round cookie cutter (1/2 inch) I cut these adorable little circles.. I didn’t know if I wanted to eat them or use them as decorations..

assembling them onto a slightly greased baking dish, they are ready for their make up Gently brush them using the leftover buttermilk. I didn’t bother with an egg wash, but you can if you want.

I baked them at 200℃ for not more than 12-15 minutes, and they didn’t puff up too much, since they’re tiny and made of thinner discs, but they rose up enough to slice them & slather with jam.

Look at these beautiful pieces.. they were so fluffy and tasty and indescribable..

Enjoy!!!!!


Banana Coconut cupcakes


This cupcake happened when I saw, the last remaining banana in my fruit basket had turned into a ghoulish yellow black with kinds sloppy looking ends..I was grinning wide because isn’t this is the perfect opportunity we are always looking for when we really want to make banana bread..?? Ok so the banana wasn’t enough for a bread, but it was more than enough for some experimenting with the just brought coconut creamer.. yes creamer because I couldn’t fine any coconut milk and my desperation for whipping up some Thai food had left me with few alternatives..

So anyways, this was by far the easiest cupcakes I have made without bothering much about the whole wet ingredients, dry ingredients shenanigans.. It was made in one bowl without any mixer.. just a spoon and a bowl..

Ingredients

1 banana

1 egg

2 tbsp brown sugar

1/4 cup coconut powder

1 tsp baking powder

1/2 cup flour

30 mls milk

15 mls vegetable oil


take the banana

add in 2 tbsp brown sugar

mash them all together like there’s no tomorrow.. doesn’t this look like melted chocolate? hah..

crack in an egg and pour in 15 mls of vegetable oil

add in the coconut powder and the baking powder.

next in is the flour.. just stir

this is the resultant brownish gloop.. and yes the kitchen was smelling awesome..

into my pretty silicone molds.. I love these colorful babies.

I filled them a little more than half way through.. you can see the banana remnants atop.. don’t worry these will all be gone..

I baked these at 200℃ for around 22 minutes.. depending on your oven.. these are hot and I ate 2 already..

Enjoy !!


Crustless cup Quiche


There’s always this time, usually on a Tuesday (at least for me).. when I want to eat something spectacular and beyond belief, but I don’t want to cook it.. or I don’t want to spend hours in the kitchen and cut something, or cook something or spend time hovering in front of the stove..

This was a brainwave or should I say the lazy Tuesday special, which was AMAZING !!!!!!!!!! it really was.. come on look at it.. it’s so pretty and so freaking EASY.. I have no steps for this, no pictures except for these shimmering golden tops..

Ingredients

2 eggs

30 mls milk

2 heaped tsp flour

1 tsp salt

1/2 tsp black pepper

1/4 tsp baking powder

1/4 tsp dried basil

Grab a bowl.. Mix in all the above ingredients.. pour into cupcake molds & bake at 200℃ for 15 minutes.. pull out and eat. This was sooooooo awesome.. i made three of these little monsters and wolfed them down like there was no tomorrow.. these are so tasty and tender and every possible adjective for awesome.

Here’s another picture.. look at it and drool and make them asap..


Warm vegetable soup for the soul


Summer’s are all gone, they’re over.. Pulling something out of the fridge is a chore, and I feel hungry all the time.. yup the winters are on their way and it’s by far the best reason to be in my kitchen.. so cozy.. so warm.

this soup came as an epiphany, when I realized it was too late for breakfast and too early for lunch and I wanted to eat something very filling, yet not very tedious.. something comforting but not at the expense of screwing my waistline.. This soup is the perfect fix and easily manageable with a medley of vegetables and top notch taste.. You’ll actually feel proud of downing more than the required amount of greens.. aah the guilt free feeling of eating something hearty..

the ingredients line up is mostly greens, but you can use whichever vegetables you like.. I have bock choy (I’m in love with them as of now), spring onions, lettuce, heaped teaspoon of cornflour, 2 red chillies chopped, 2 fat cloves of garlic, 1/2 inch cube of ginger, 1 long long green chilly, 300 mls water, black pepper, soya sauce, vinegar and of course salt.. I didn’t use any since the soya sauce was more than sufficient.. & yes 2 tsps oil.

Not very artistic, but here is a clear view of all the chopped greens. I think I just tore off the lettuce with my bare hands.. such was my ferocity ( I was watching hulk while cooking this .. sorry !!)

and now we start.. first in were the chillies.. the red and the green

the ginger & the garlic follow.. this is the most fabulous aroma ever.. This was a great meal

Stir ’em together and breathe in deep.. mmm

in goes the black pepper, sprinkle liberally.

followed by the vinegar.. a nice & generous splash

a healthy dose of soya sauce

we now proceed with the vegetables..

It was at this point that I seriously thought I should have used a bigger pot or pan.. but ok.. what is life without a few risks??

can you imagine the concentration I was putting in while stirring this without spilling anything outside and watching Hulk at the same time.. which reminds me ‘how hot is Edward Norton??’ say.. I think it was watching the green man that prompted me to make this soup in the first place.. hmm anyways..

See.. can you see all of it coming together? I was finally able to combine them all without much spillage..

isn’t this the prettiest? Once it’s all combined, just sprinkle the cornglour all over and mix it well in.

add in water because it’s a soup.. you can also ad in your favourite stock.. no problem at all.

I also added in 1/2 tsp of sugar, just to balance out the taste.. it doesn’t sweeten the soup at all. Just gives it a very nice undertone.

We’re almost done.. just cover it and let cook for 5 minutes or so.. I promise this is going to be the best brunch soup ever.

Uncover for a moment.. look at it boiling, smell in deep and admire for a while

This is it.. it’s done.. it was so pretty I had tears of joy.. every bite is so full of flavors. If you want it as a complete meal, I suggest add in some boiled noodles ,or chunks of ham or leftover chicken.. This was such a good meal, my impatience resulted in a burnt tongue, a t-shirt with soya stains and the most memorable Hulk movie ever.

Have fun with this recipe.. !! Enjoy.


Way too easy macaroni


Home alone, hungry and too lazy to make anything extravagant & in reality not interested in distracting yourself when your favourite movie is on..

Wat do you do? cook something when the commercial break is on.. This is the easiest in fact too embarrassingly easy and crazy delicious version of the lazy wife macaroni edition..

This post doesn’t have the cooking instructions and picture tutorial, for the reasons that I didn’t have my camera on me and that it was almost too lame to put the pictures of a hot skillet and boiling noodles.. really it was that easy..

Ingredients

macaroni/pasta noodles – depending how hungry you are.. I used 3/4 cup

2 tsp olive oil

1 clove crushed garlic

1 tsp salt

1 tsp turmeric powder (completely optional)

1 tsp chilli flakes (cuz I needed some bite & kick)

Boil your noodles according to package instructions

Heat the oil and add in the garlic, turmeric, chilli & salt and tip in the macaroni.. and that’s it. I got this big bowl and finished it in no time. So basically it took two commercial breaks.. in one I put the macaroni on boil and in the other I made everything else.. Seriously that easy..

Enjoy!!!